Offloading Amazon RDS reads to read replicas

In this post; we will look at adding read replicas to a single Amazon Relational Database Service (RDS) database instance. We will compare the database load before and after adding read replicas. We will use Mysqlslap to emulate our database load and Performance Insights to monitor the database load.
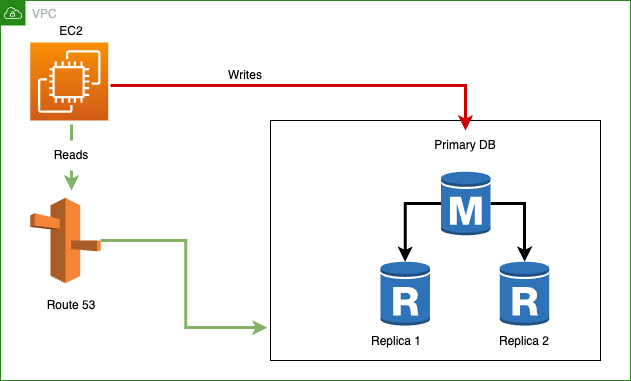
Our final setup will look as below:
Why?
Replicas benefit read-heavy workloads as they improve performance by minimizing the load on the primary database instance. They make it easy to elastically scale out beyond the capacity constraints of a single DB instance. Before you reach for the next database instance class (scaling up), consider replicas (scaling out). You can use replica endpoints for your ETL processes for the analytics team etc.
Replicas can be promoted in disaster recovery. If the primary goes offline, a replica can be promoted to become primary. However, replication lag should be considered to avoid data loss. You want to promote a replica that has a near-zero replication lag.
We will follow these steps:
Step 1 - Create a single RDS Instance
Step 2 - Run benchmark queries on our RDS instance using mysqlslap. Mysqlslap is a diagnostic program designed to emulate client load for a MySQL server and to report the timing of each stage. It works as if multiple clients are accessing the server.
Step 3 - Create a read replica(s) from our RDS instance
Step 4 - Use Route53 to distribute read requests across multiple RDS read replicas.
Step 5 - Run the same benchmark queries leveraging Route53 record sets.
Create a single Amazon RDS Instance
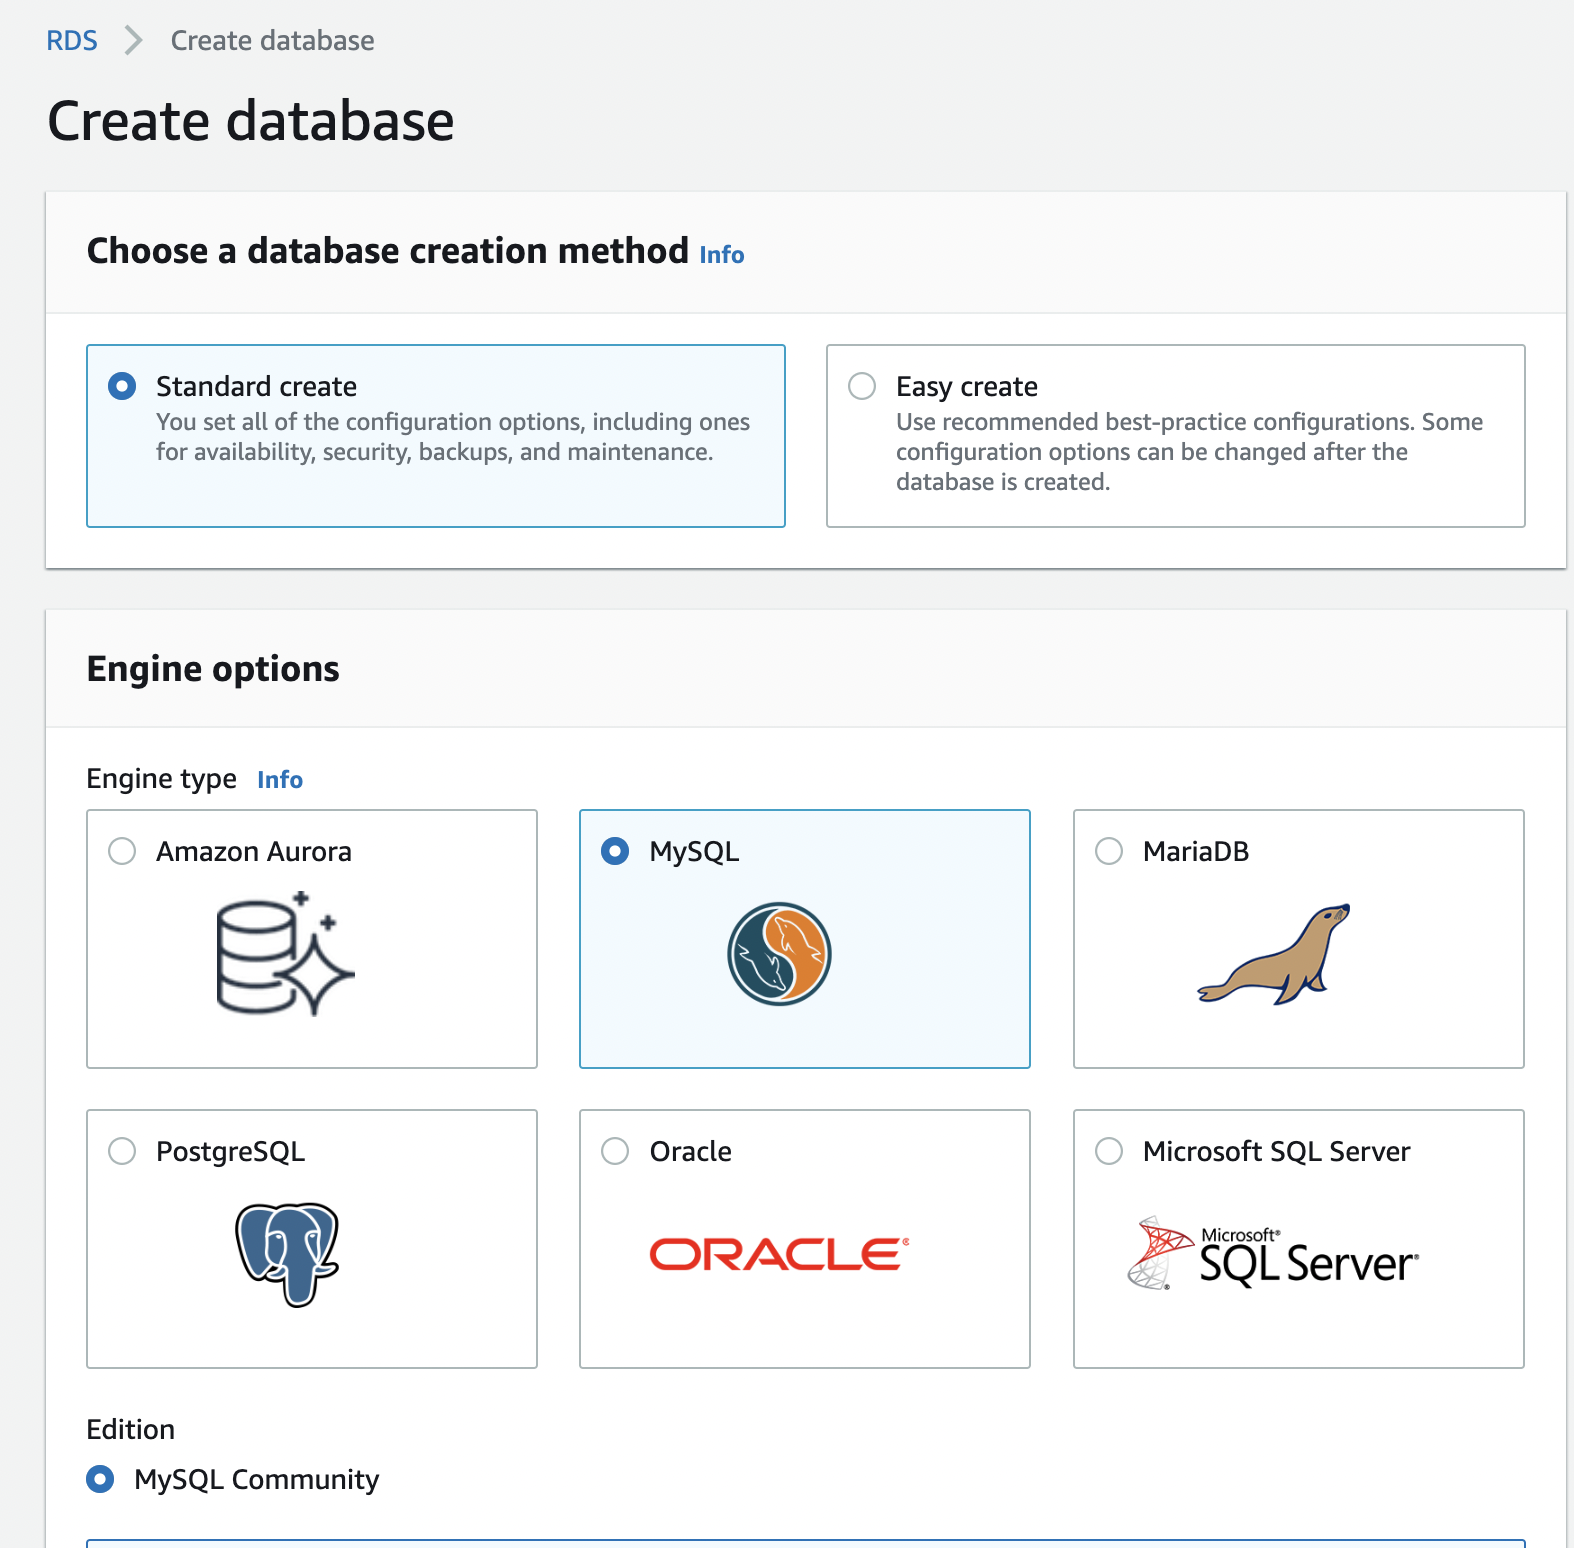
- Navigate to the AWS console and search for RDS
- For the database creation method, select the Standard create option.
- Select MySQL for the Engine options.
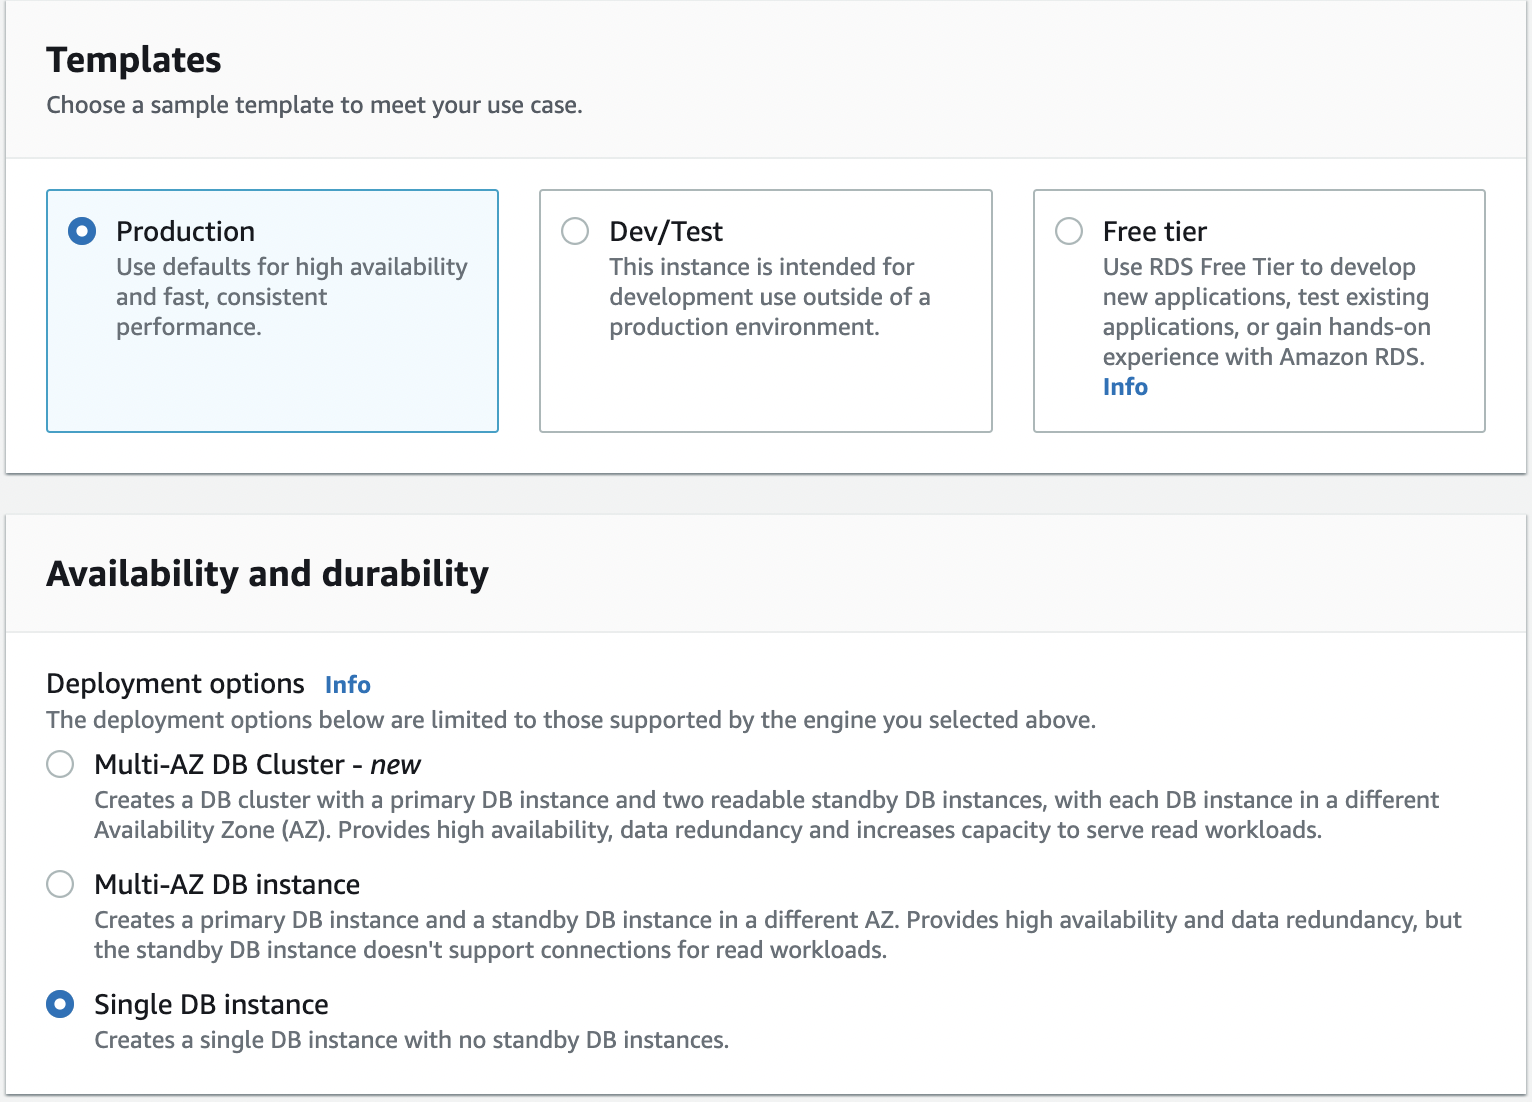
- Select Production template
- Select Single DB instance for Availability and durability (in production, you will want to use Multi-AZ)
- On the Settings screen, enter the password and leave the rest of the settings as is.
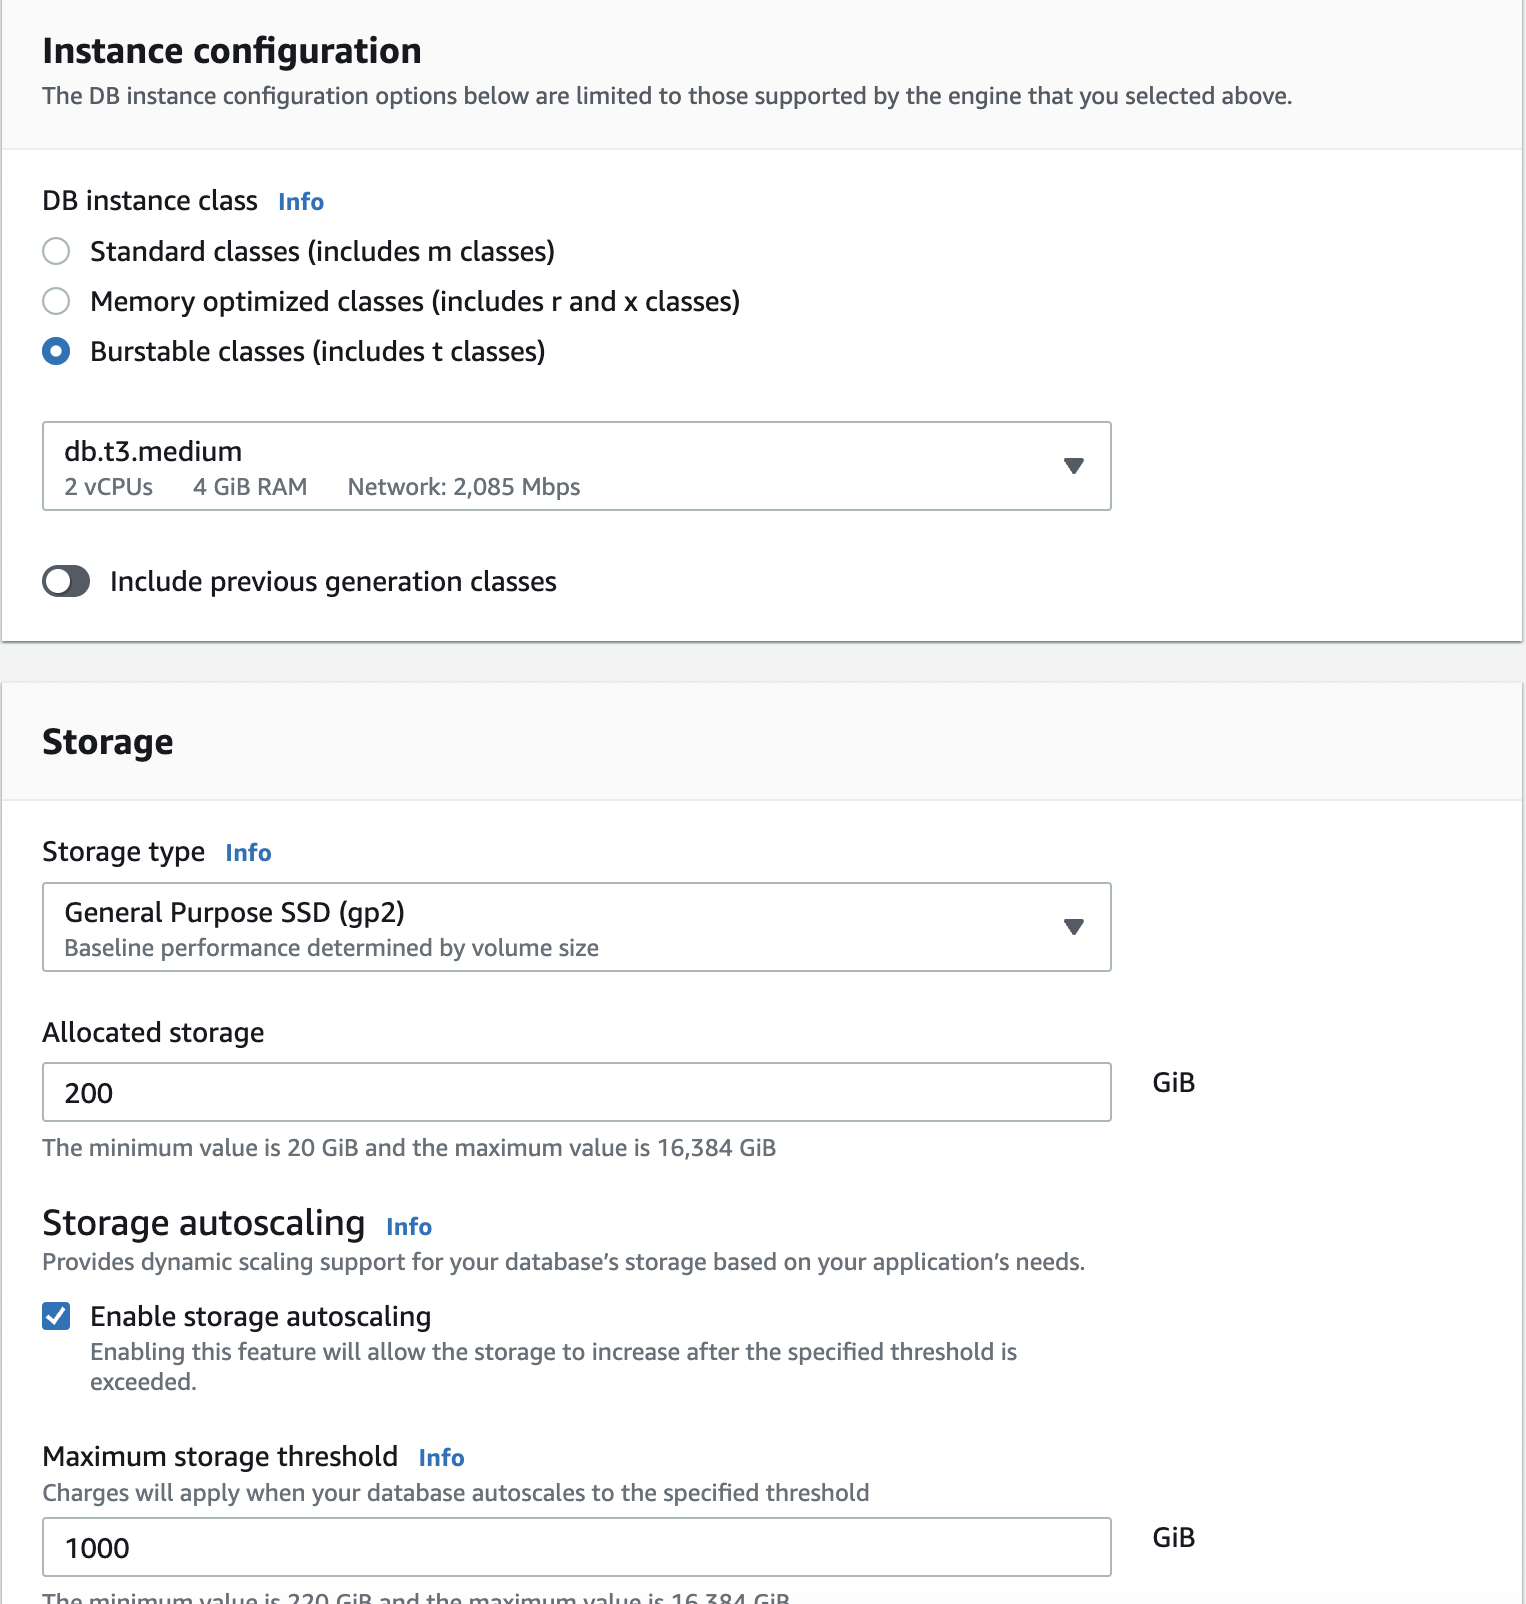
- For instance configuration, select Burstable classes and choose at least a db.t3.medium instance size (we need more memory to enable Performance Insights)
- For Storage type, select General Purpose SSD (gp2) and keep the rest of the settings default.
- In terms of Connectivity, keep the default settings, maintaining No public access for the database instance. You can optionally create a new VPC if you like.
- For Database authentication, select Password authentication
- Under Monitoring, make sure Turn Performance Insights is checked
- When done, click the Create Database button to launch your database instance.
Benchmark queries using mysqlslap
We can run the benchmark queries in an Amazon EC2 instance or AWS Cloud9 environment. Our database instance is not accessible publicly, so we need to access it within our VPC. I’m going to use the Cloud9 environment. AWS Cloud9 is a cloud-based integrated development environment (IDE) that allows you to write, run and debug code via the browser.
Cloud9 Setup
Create environment
- Navigate to your AWS console and search for Cloud9.
- Click on the Create environment button.
- Provide a name for your environment.
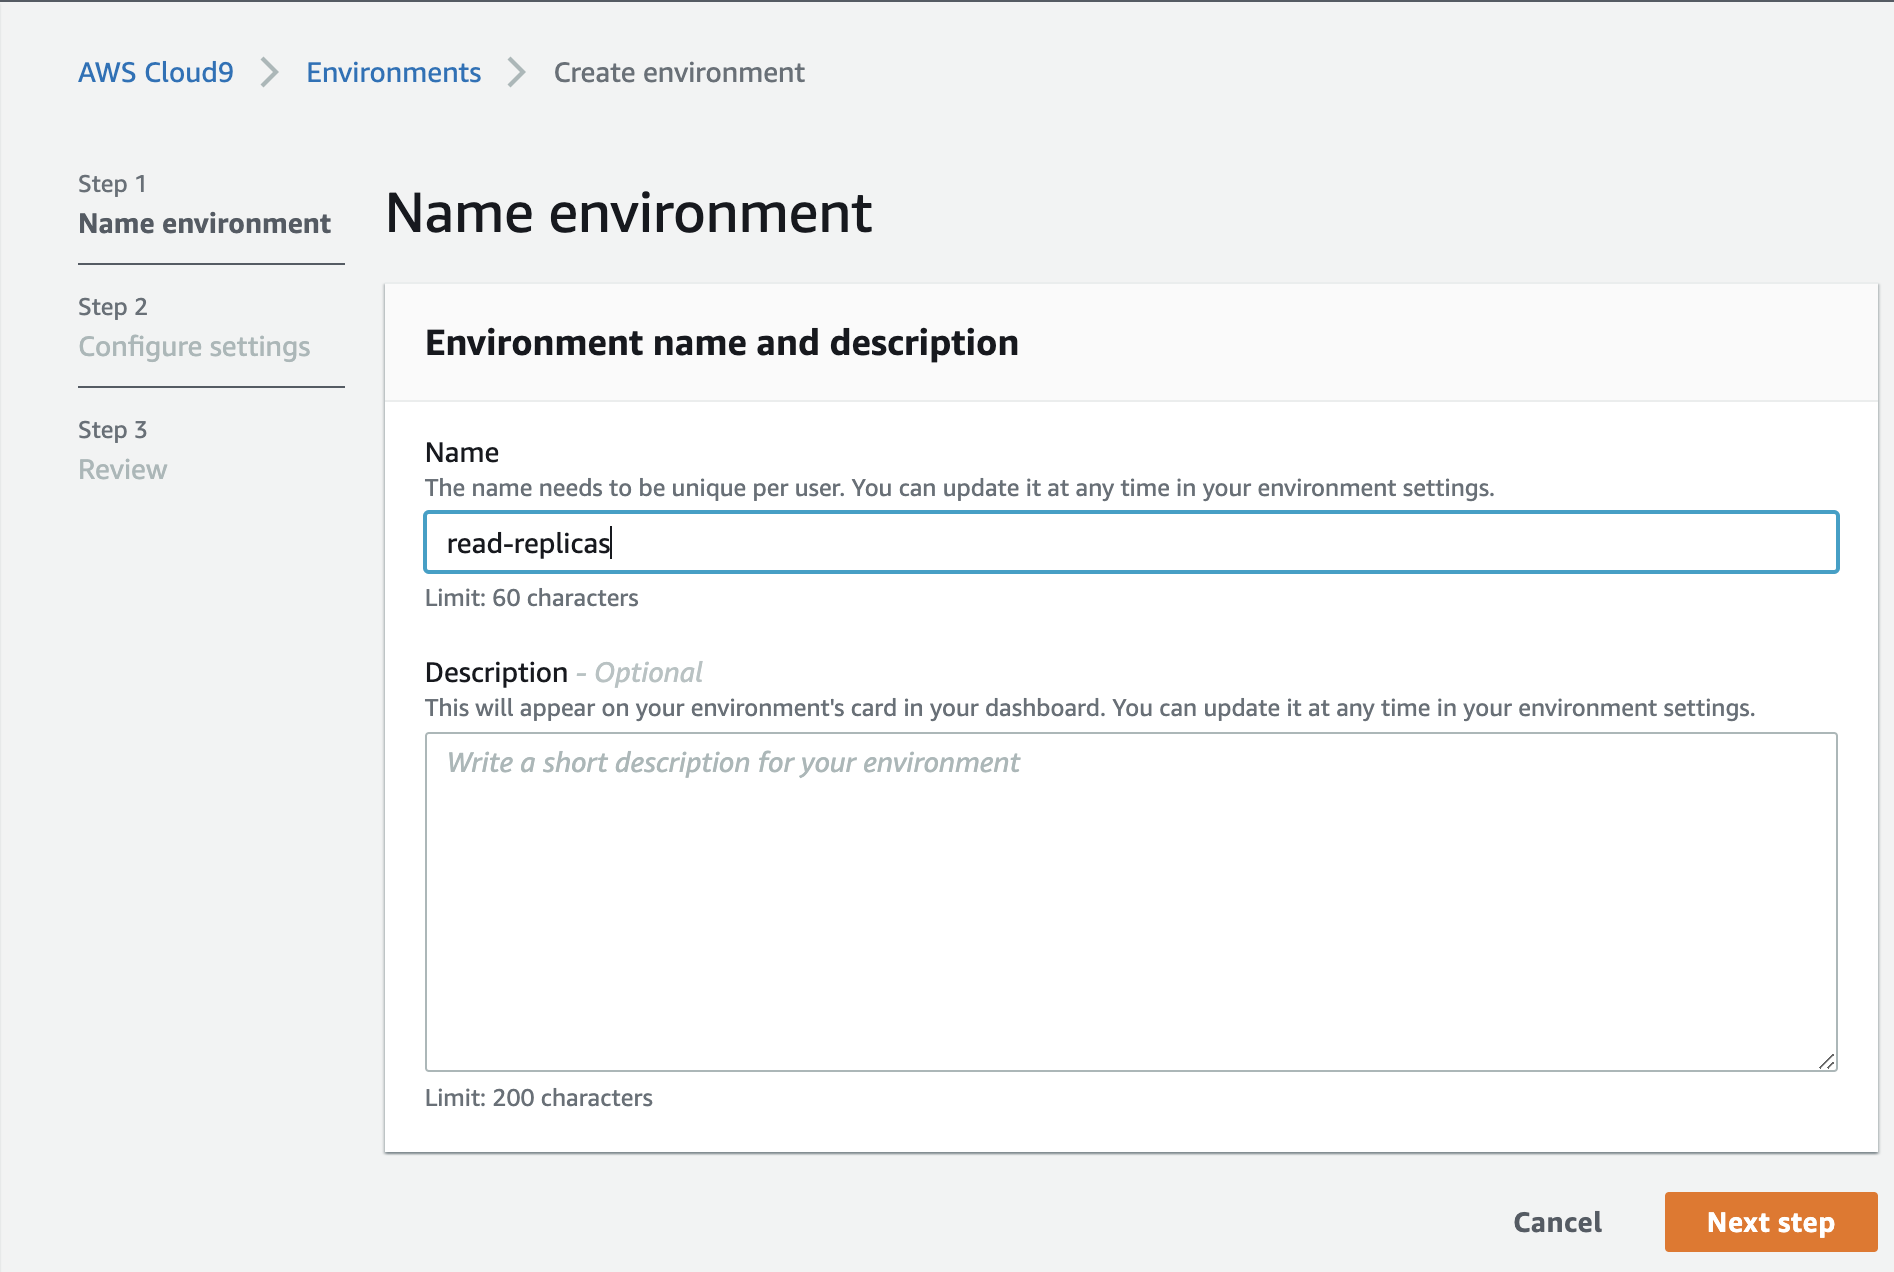
- Click next, and you should be ok with the default settings.
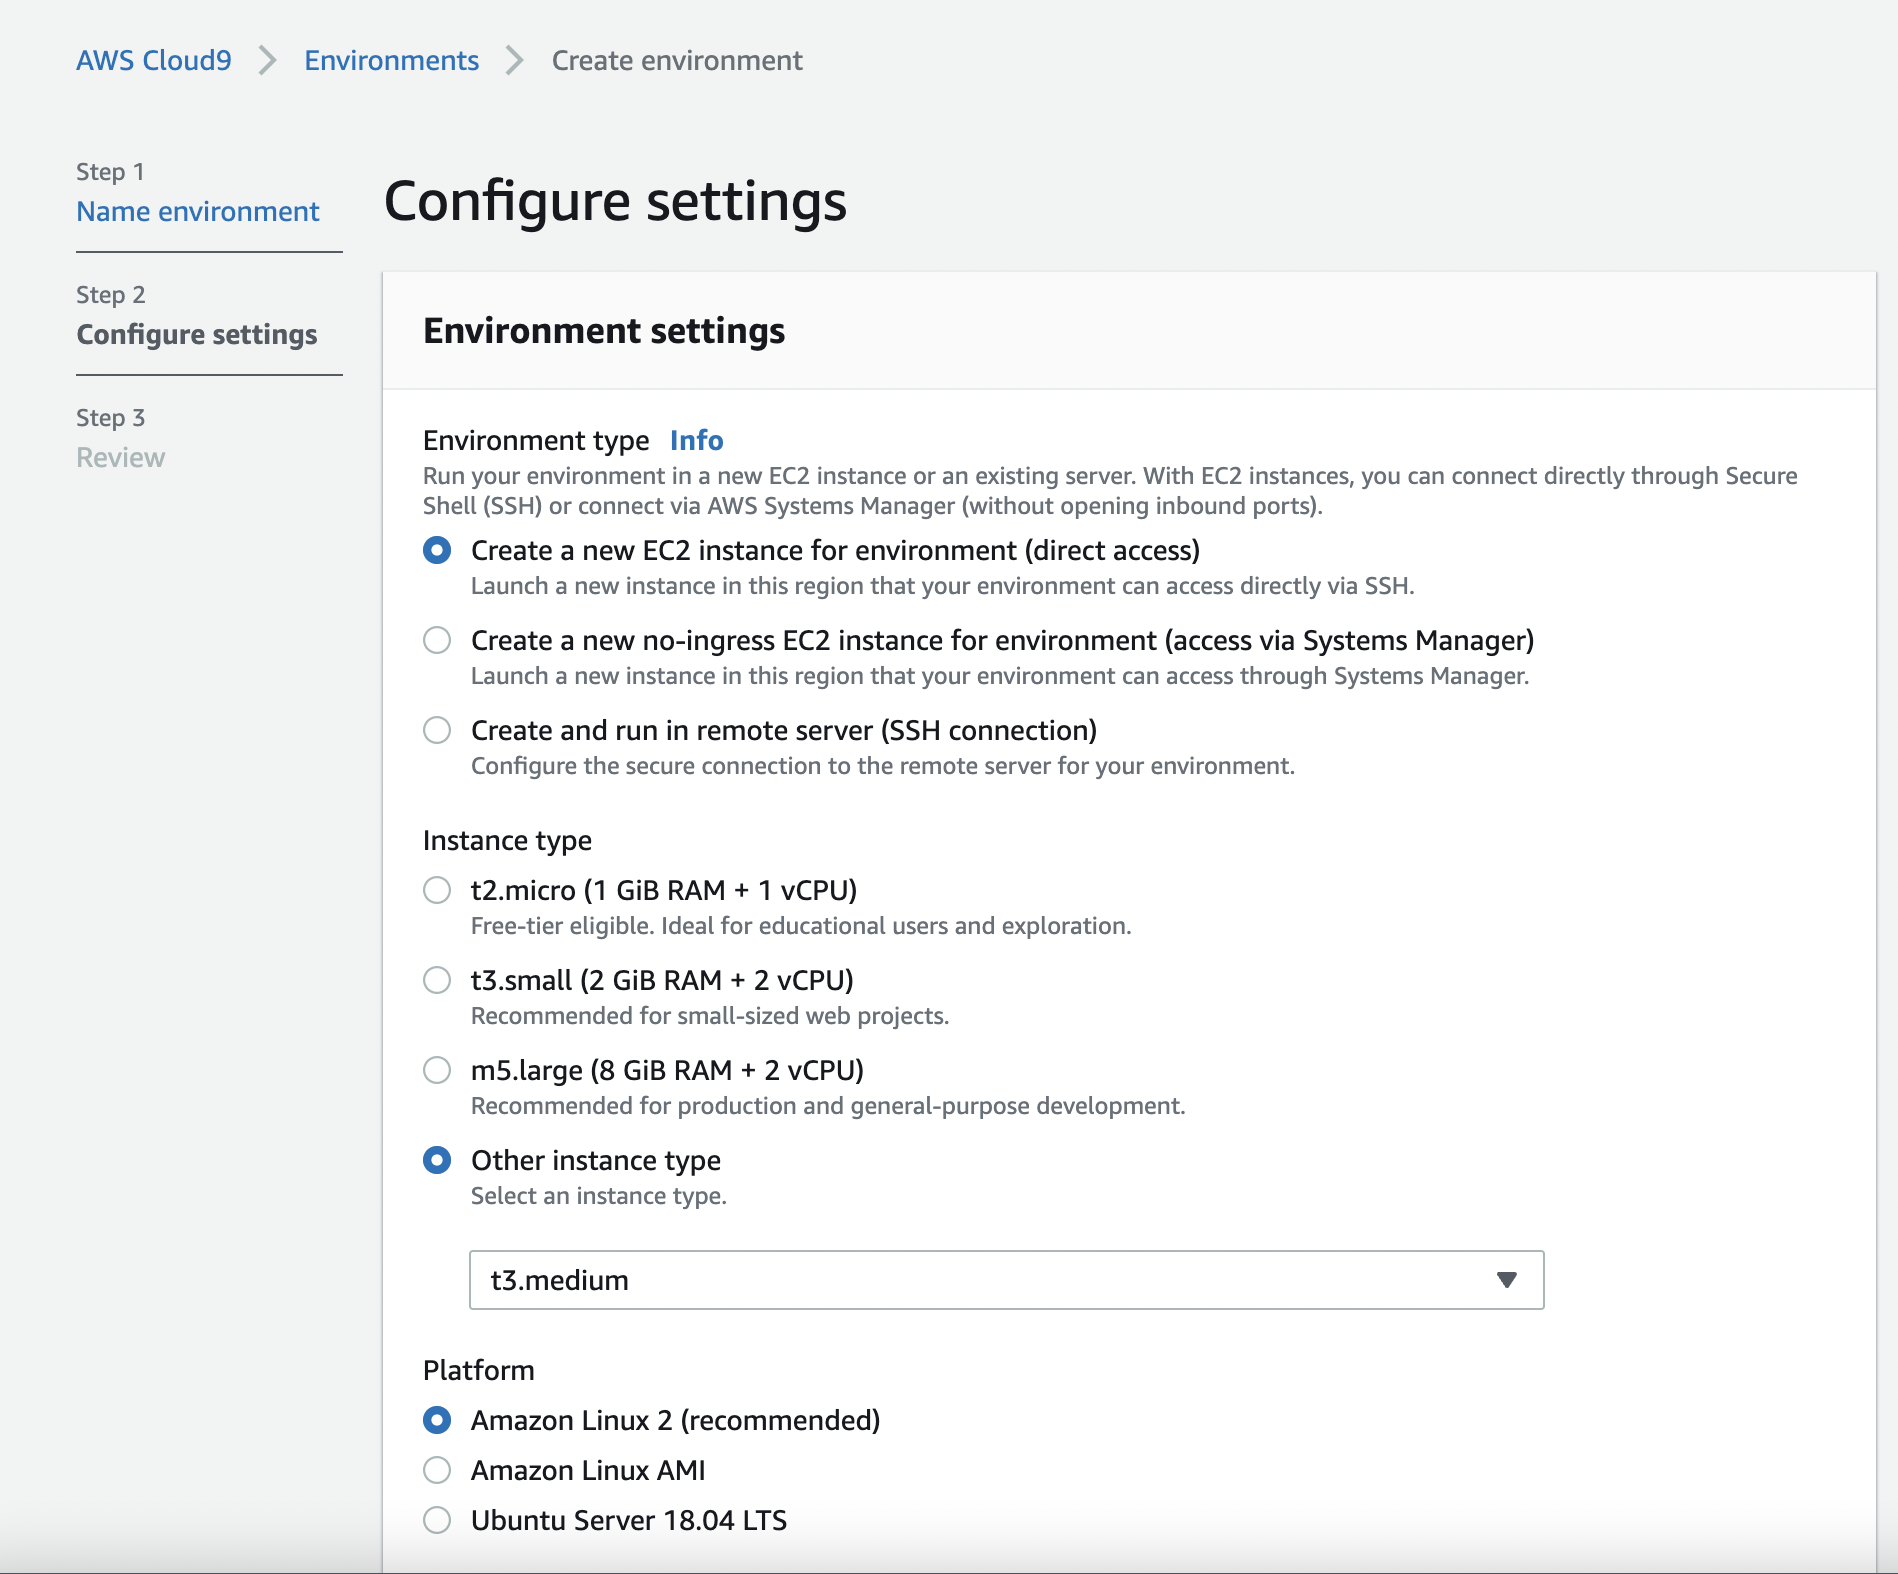
Proceed with all the remaining steps and create your environment. The creation process may take a few minutes.
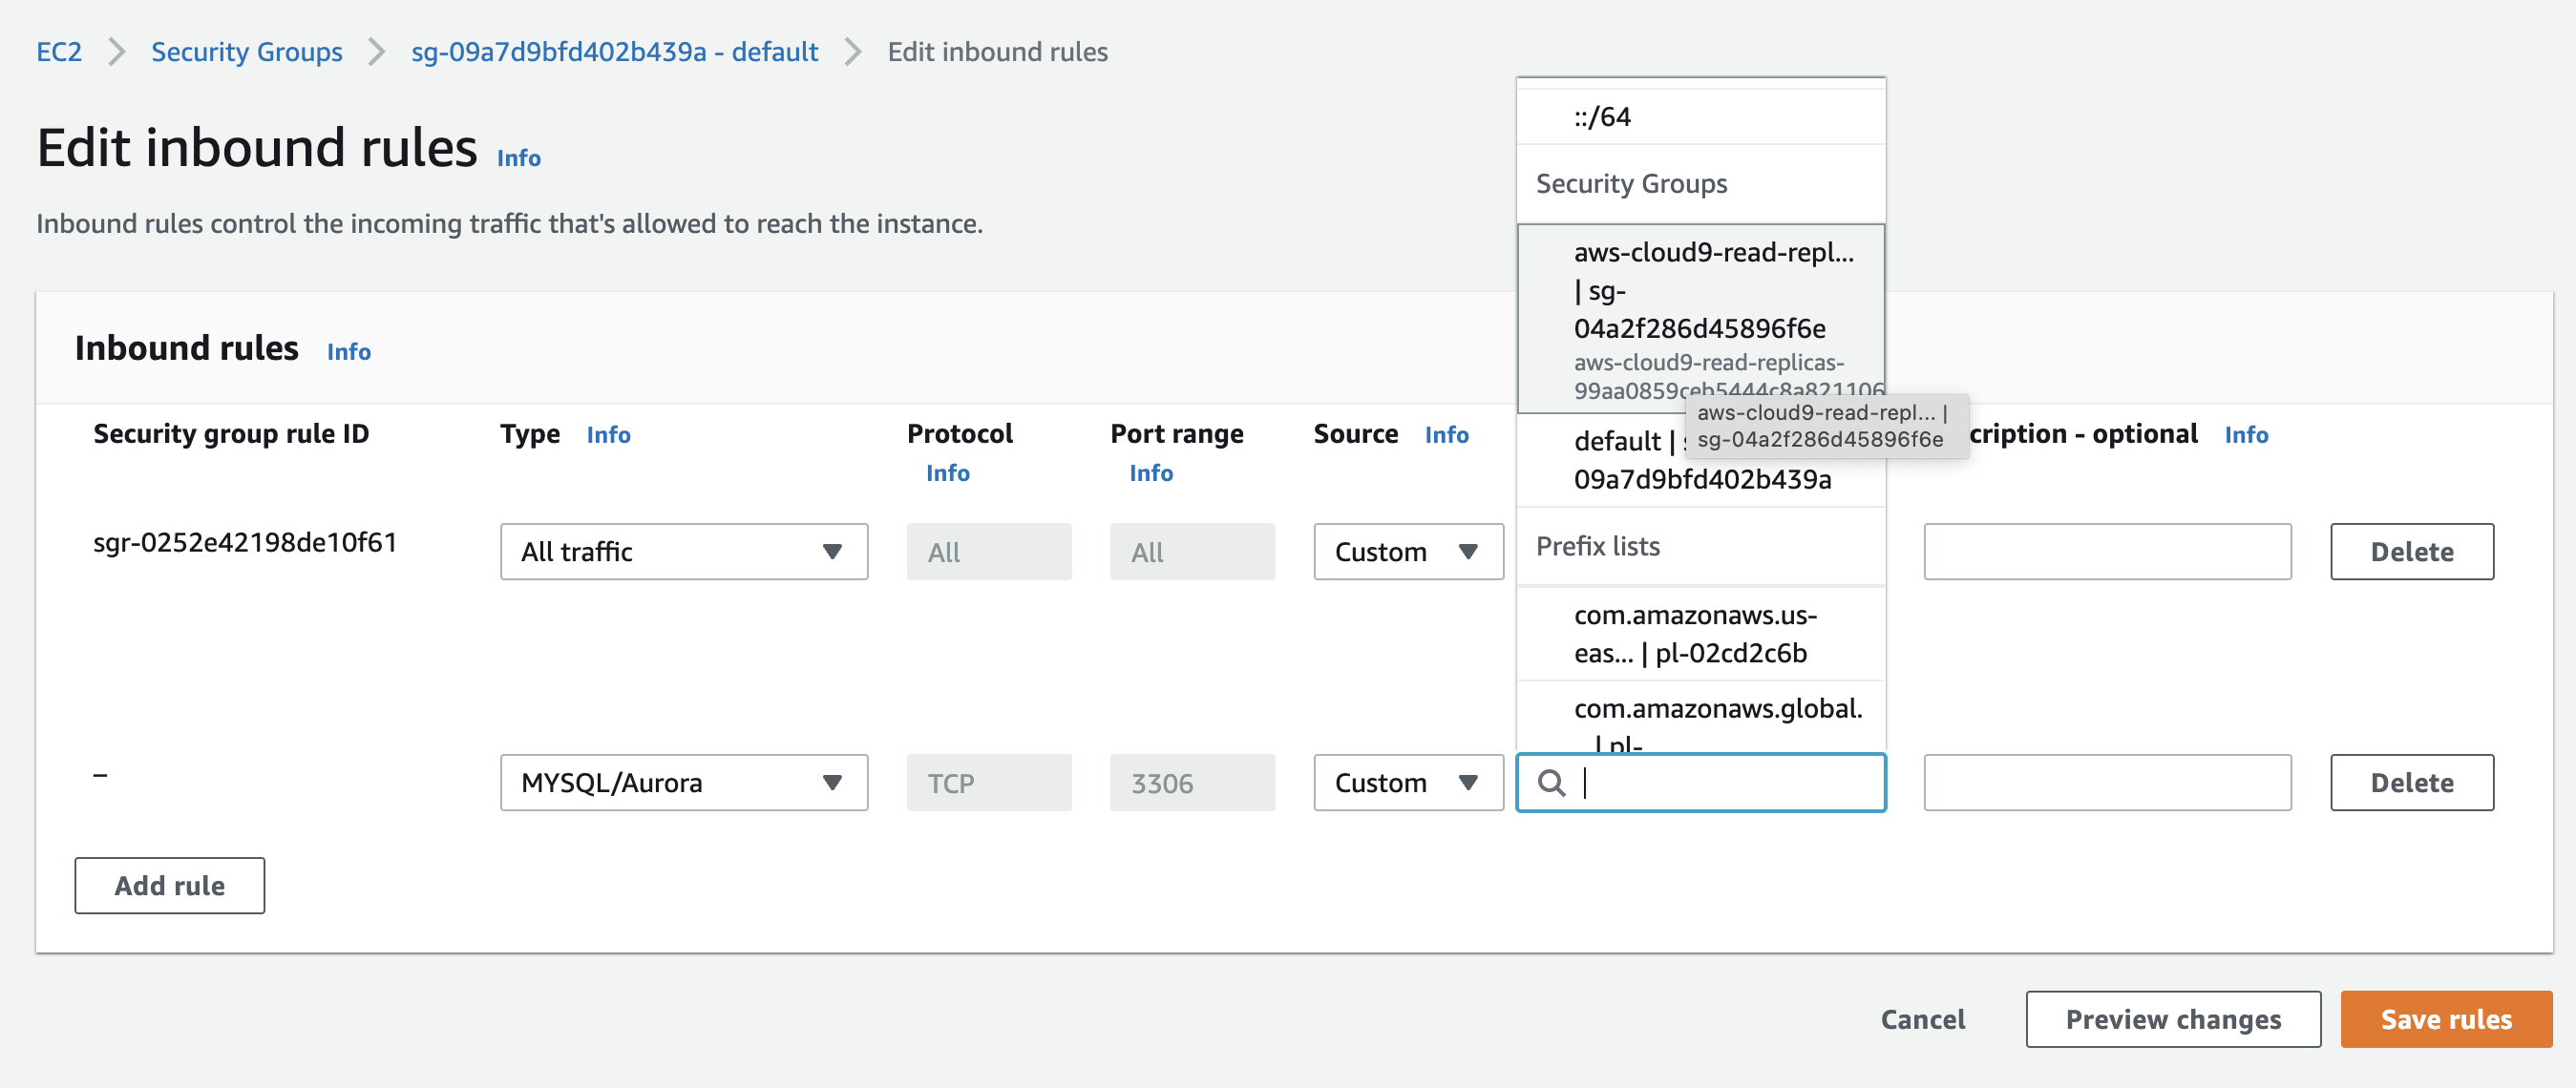
Give Cloud9 permission to access MySQL. Our Cloud9 environment will need permission to access our database instance. We achieve that by going to the instance’s security group and adding an inbound rule that allows MySQL traffic from our Cloud9 instance as below:
Clone sample database repository
Next, we must pull in a sample database to test our database instances. The sample database can be found at https://github.com/datacharmer/test_db, and you can also read more about it at https://dev.mysql.com/doc/employee/en/.
AWS Cloud9 EC2 environments come preinstalled with Git. In your Cloud9 environment terminal, run the following commands:
git clone https://github.com/datacharmer/test_db.git && cd test_db
Run the script to create the database schema and load the data. Replace the host with your own database DNS endpoint.
mysql -h database-1.ctlblrdarm7c.us-east-1.rds.amazonaws.com \
-u admin -p \
-t < employees.sql \
If you get an error similar to ERROR 2002 (HY000): Can't connect to MySQL server on … go back and make sure your Cloud9 environment security group has inbound permission to your database instance security group.
Otherwise, you should see output similar to below:
mysql -h database-1.ctlblrdarm7c.us-east-1.rds.amazonaws.com \
-u admin -p -t < employees.sql
Enter password:
+-----------------------------+
| INFO                        |
+-----------------------------+
| CREATING DATABASE STRUCTURE |
+-----------------------------+
+------------------------+
| INFO                   |
+------------------------+
| storage engine: InnoDB |
+------------------------+
+---------------------+
| INFO                |
+---------------------+
| LOADING departments |
+---------------------+
+-------------------+
| INFO              |
+-------------------+
| LOADING employees |
+-------------------+
+------------------+
| INFO             |
+------------------+
| LOADING dept_emp |
+------------------+
+----------------------+
| INFO                 |
+----------------------+
| LOADING dept_manager |
+----------------------+
+----------------+
| INFO           |
+----------------+
| LOADING titles |
+----------------+
+------------------+
| INFO             |
+------------------+
| LOADING salaries |
+------------------+
+---------------------+
| data_load_time_diff |
+---------------------+
| 00:00:39            |
+---------------------+
Run mysqlslap on primary instance
We are going to use the following mysqlslap command to emulate load on our primary database instance.
mysqlslap -h database-1.ctlblrdarm7c.us-east-1.rds.amazonaws.com -u admin -p \
--concurrency=10 \
--iterations=15 \
--create-schema=employees \
--query="SELECT * FROM employees;SELECT * FROM titles;SELECT * FROM dept_emp;SELECT * FROM dept_manager;SELECT * FROM departments;" --delimiter=";" \
--verbose
Let’s explain some of the mysqlslap options.
| Option | Explanation |
| concurrency | Number of clients to simulate when issuing the SELECT statement |
| iterations | Number of times to run the tests |
| create-schema | Schema in which to run the tests |
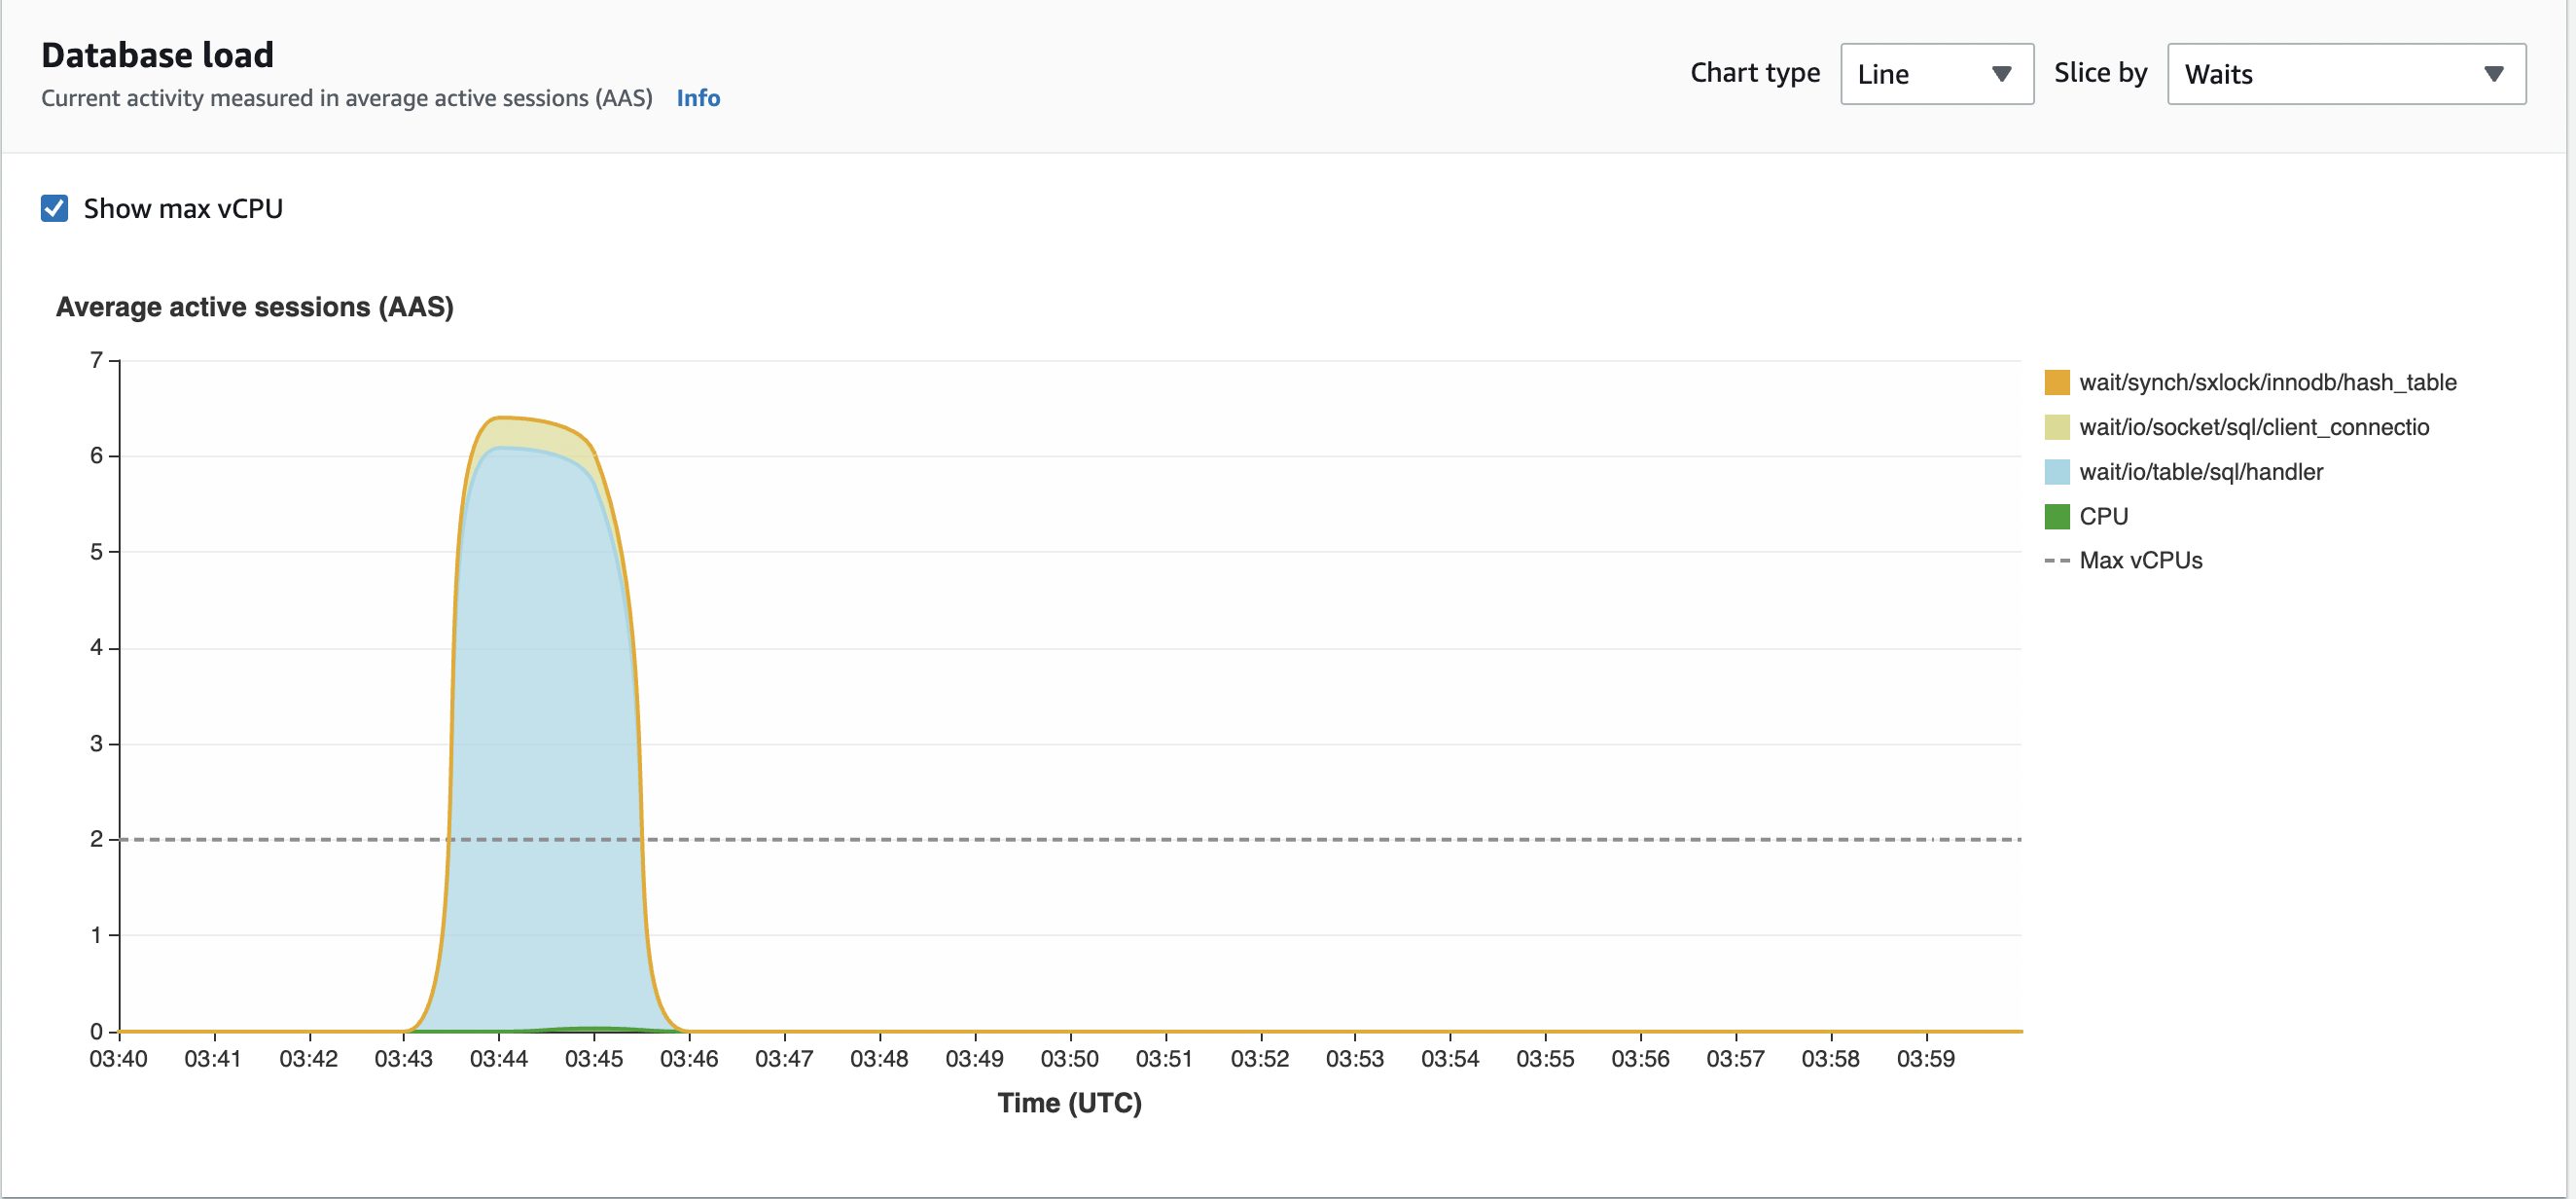
Database load sliced by Waits
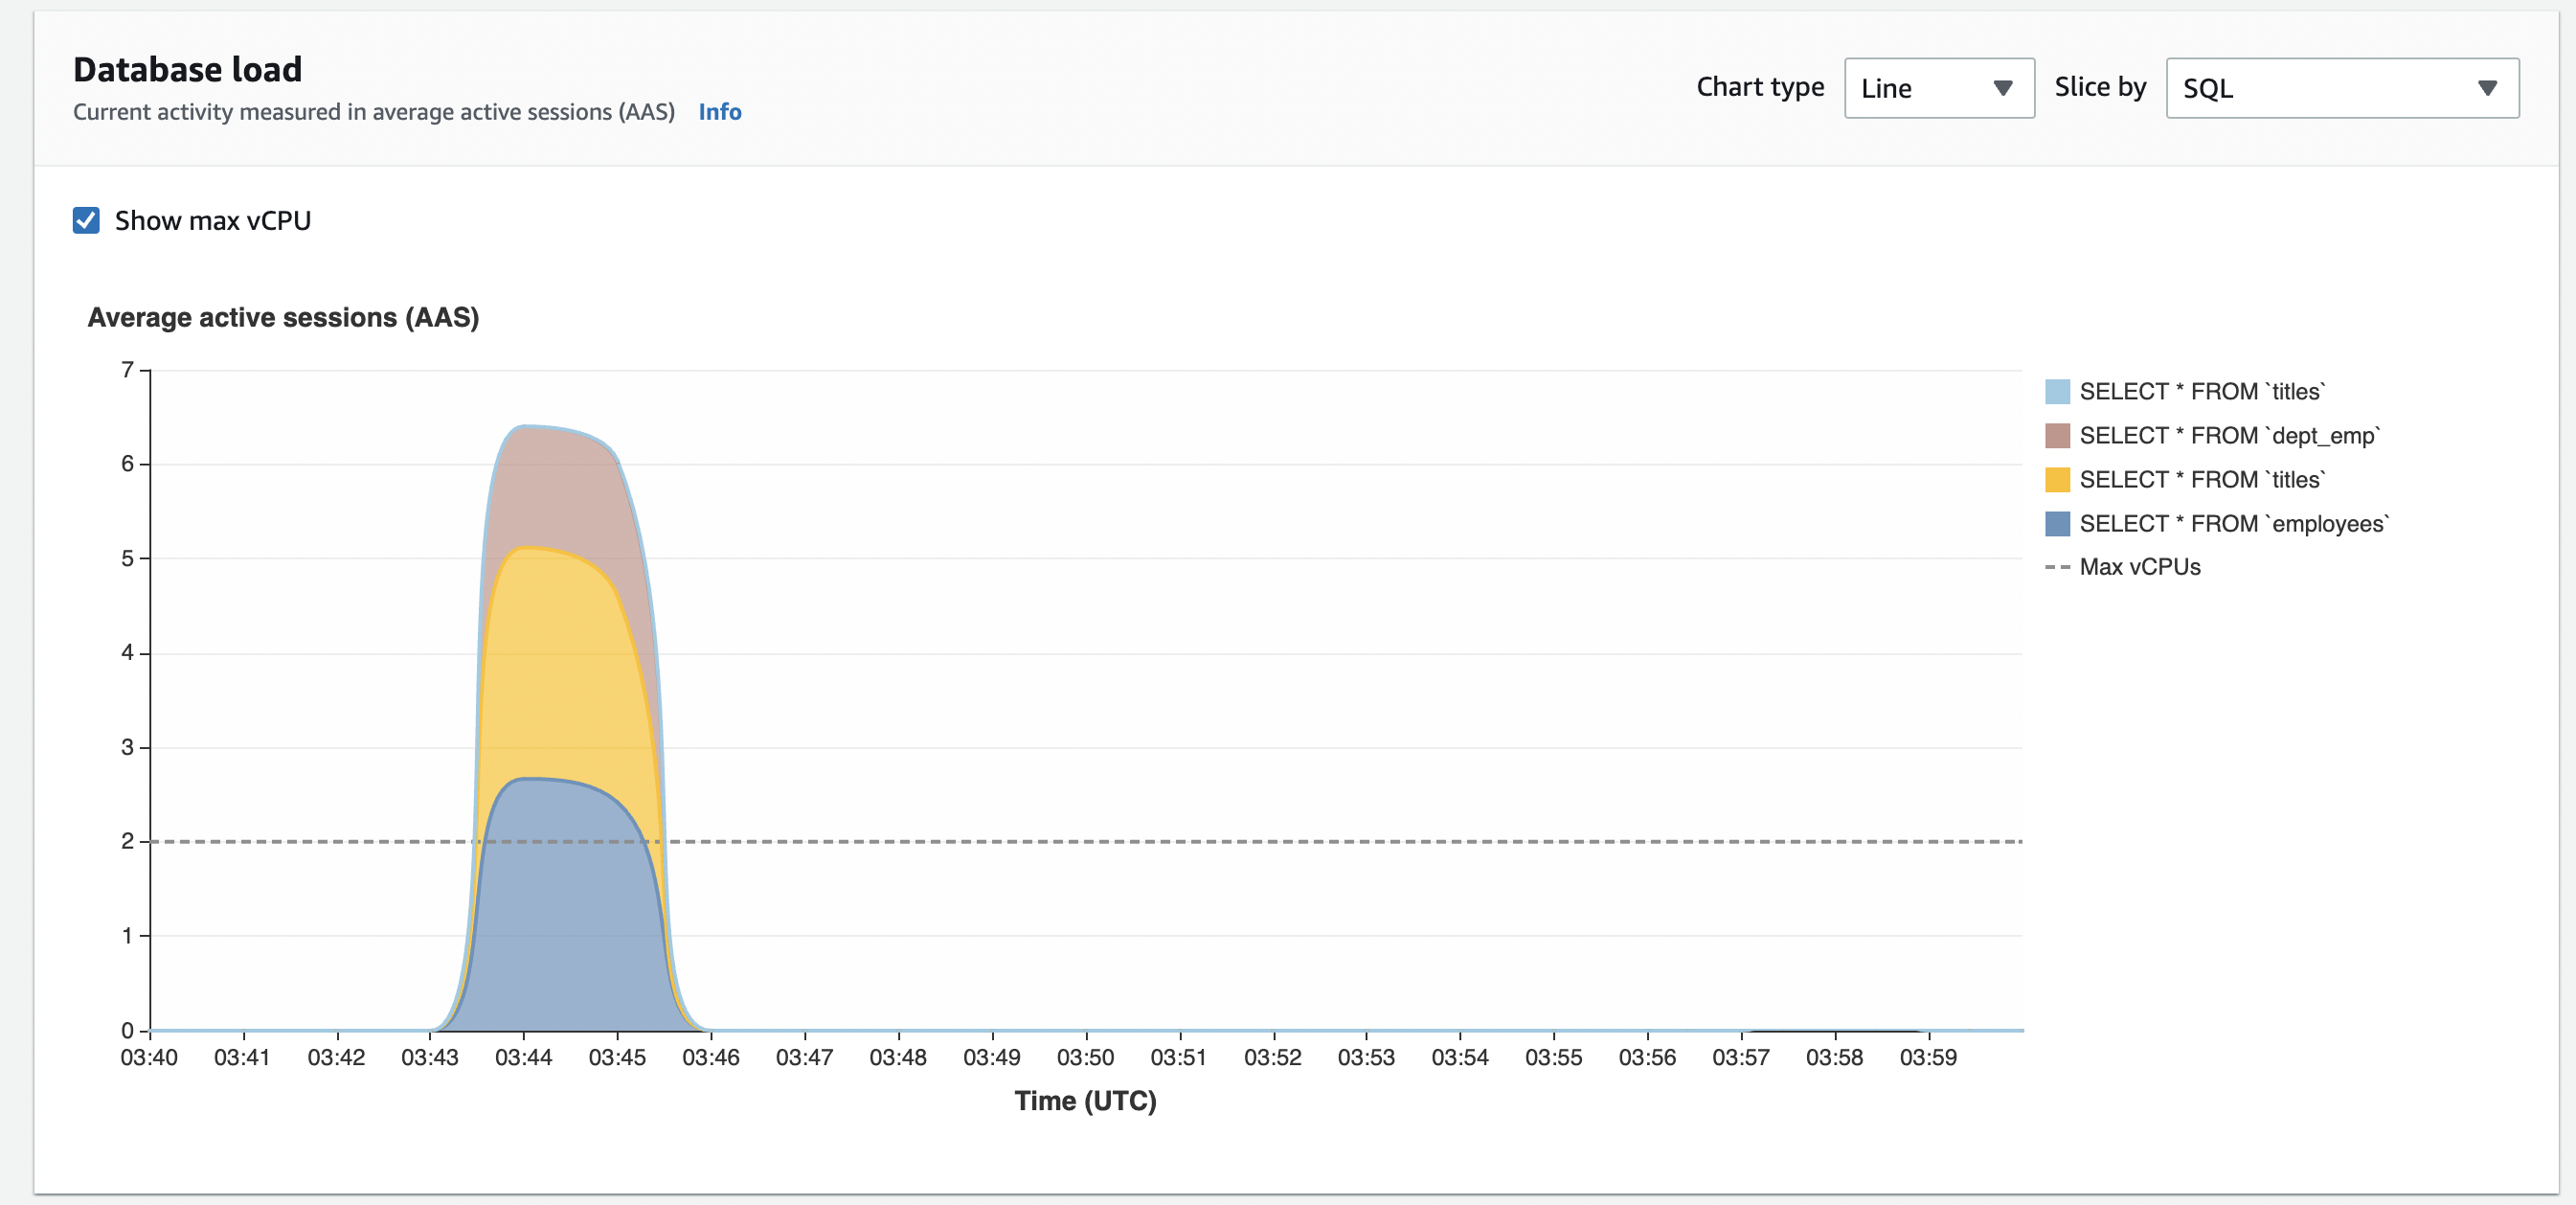
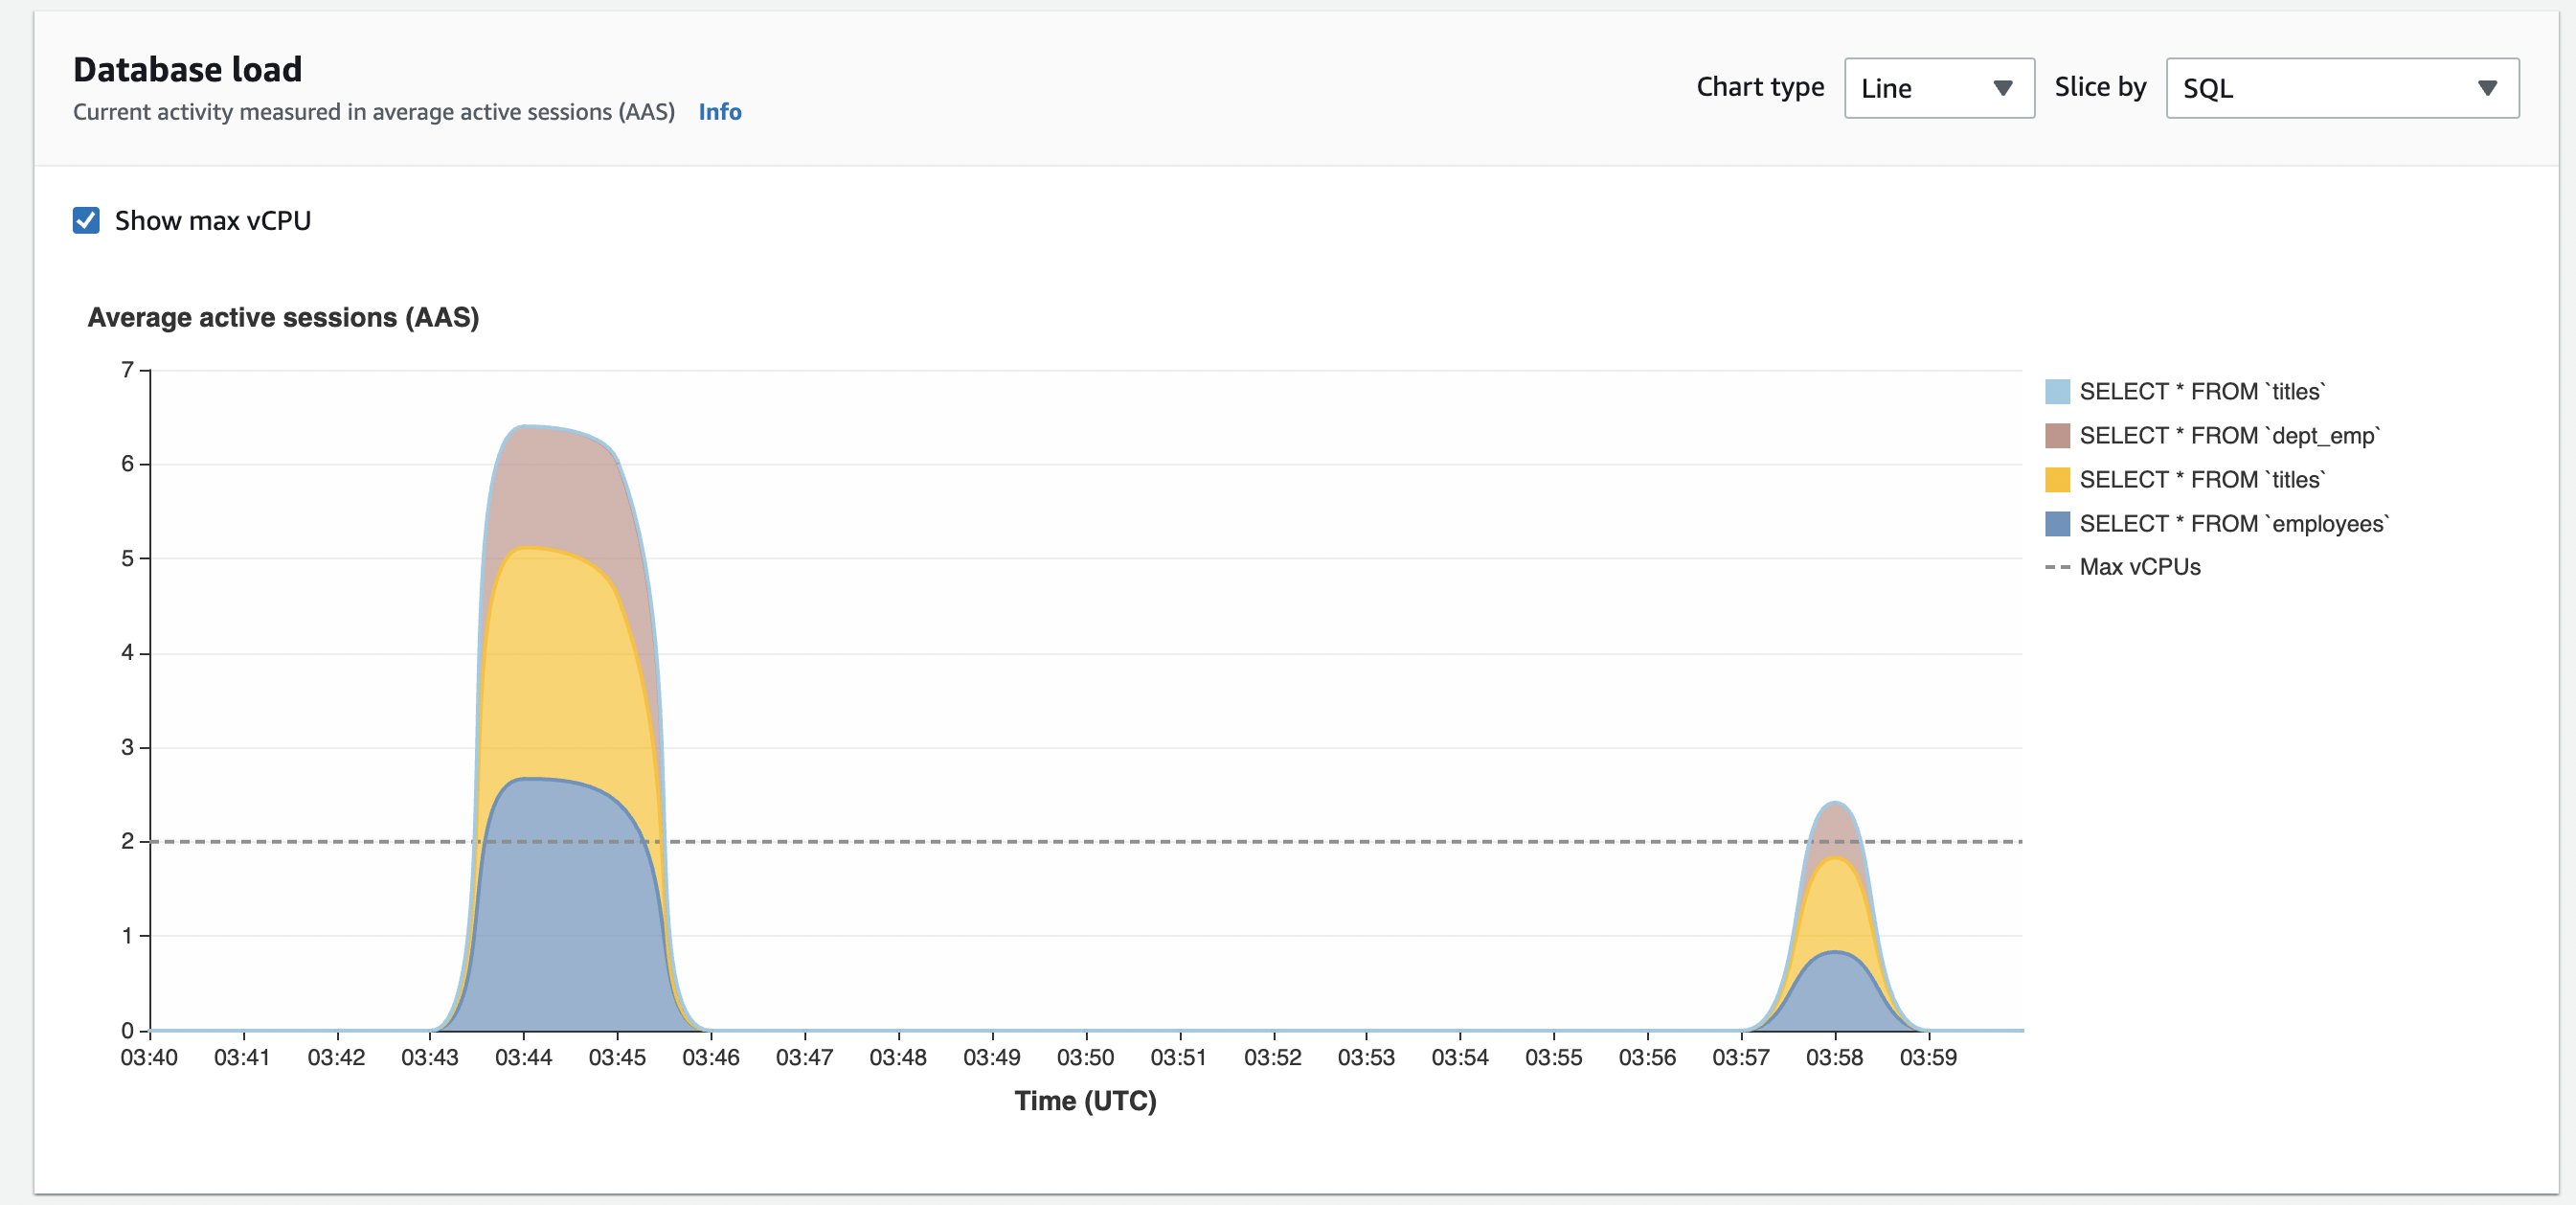
Database load sliced by SQL queries
Create read replicas
Now let’s create our read replicas.
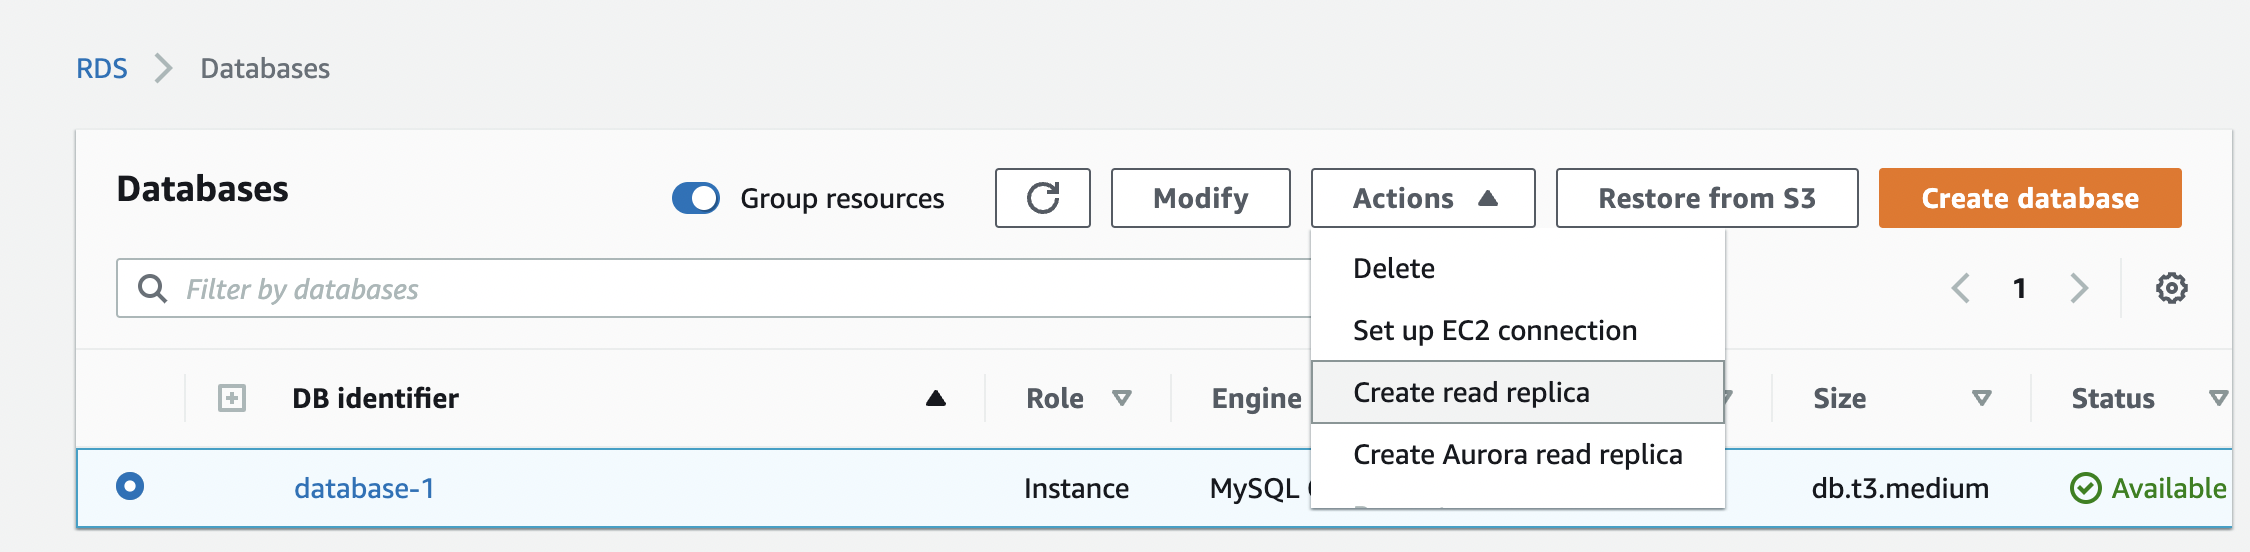
- Navigate to your AWS RDS console
- Select your primary database instance, and from the Actions drop-down click Create read replica
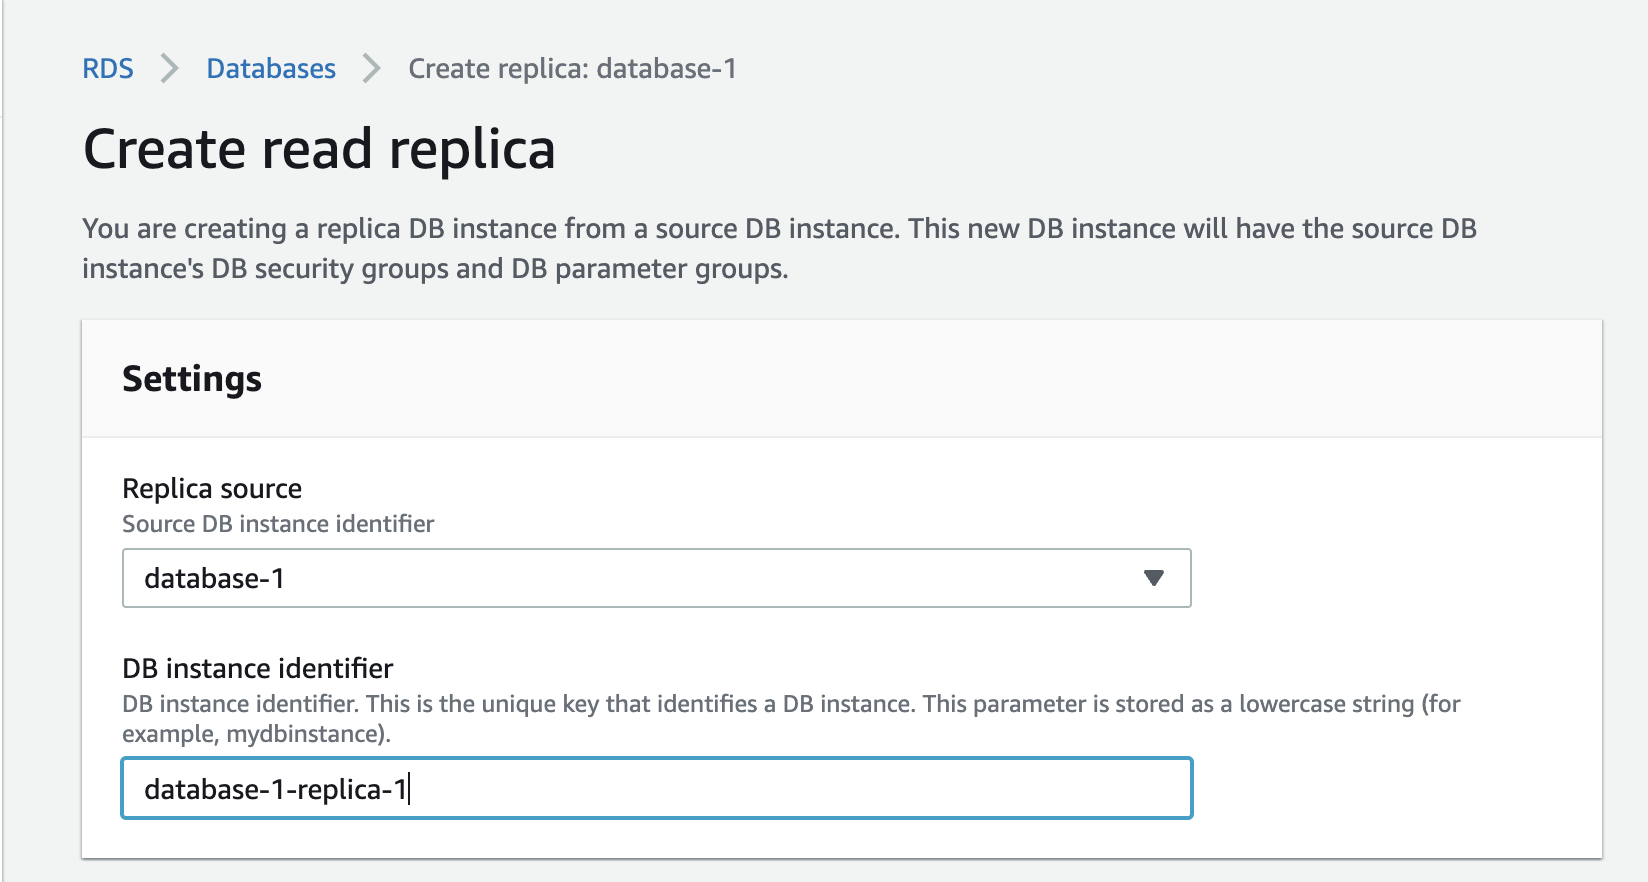
- Add a title for your read replica as below. Keep the other defaults and create the replica
- Repeat the step above and create a second replica named database-1-replica-2. When you are done, you will have a primary instance and two replicas as below.
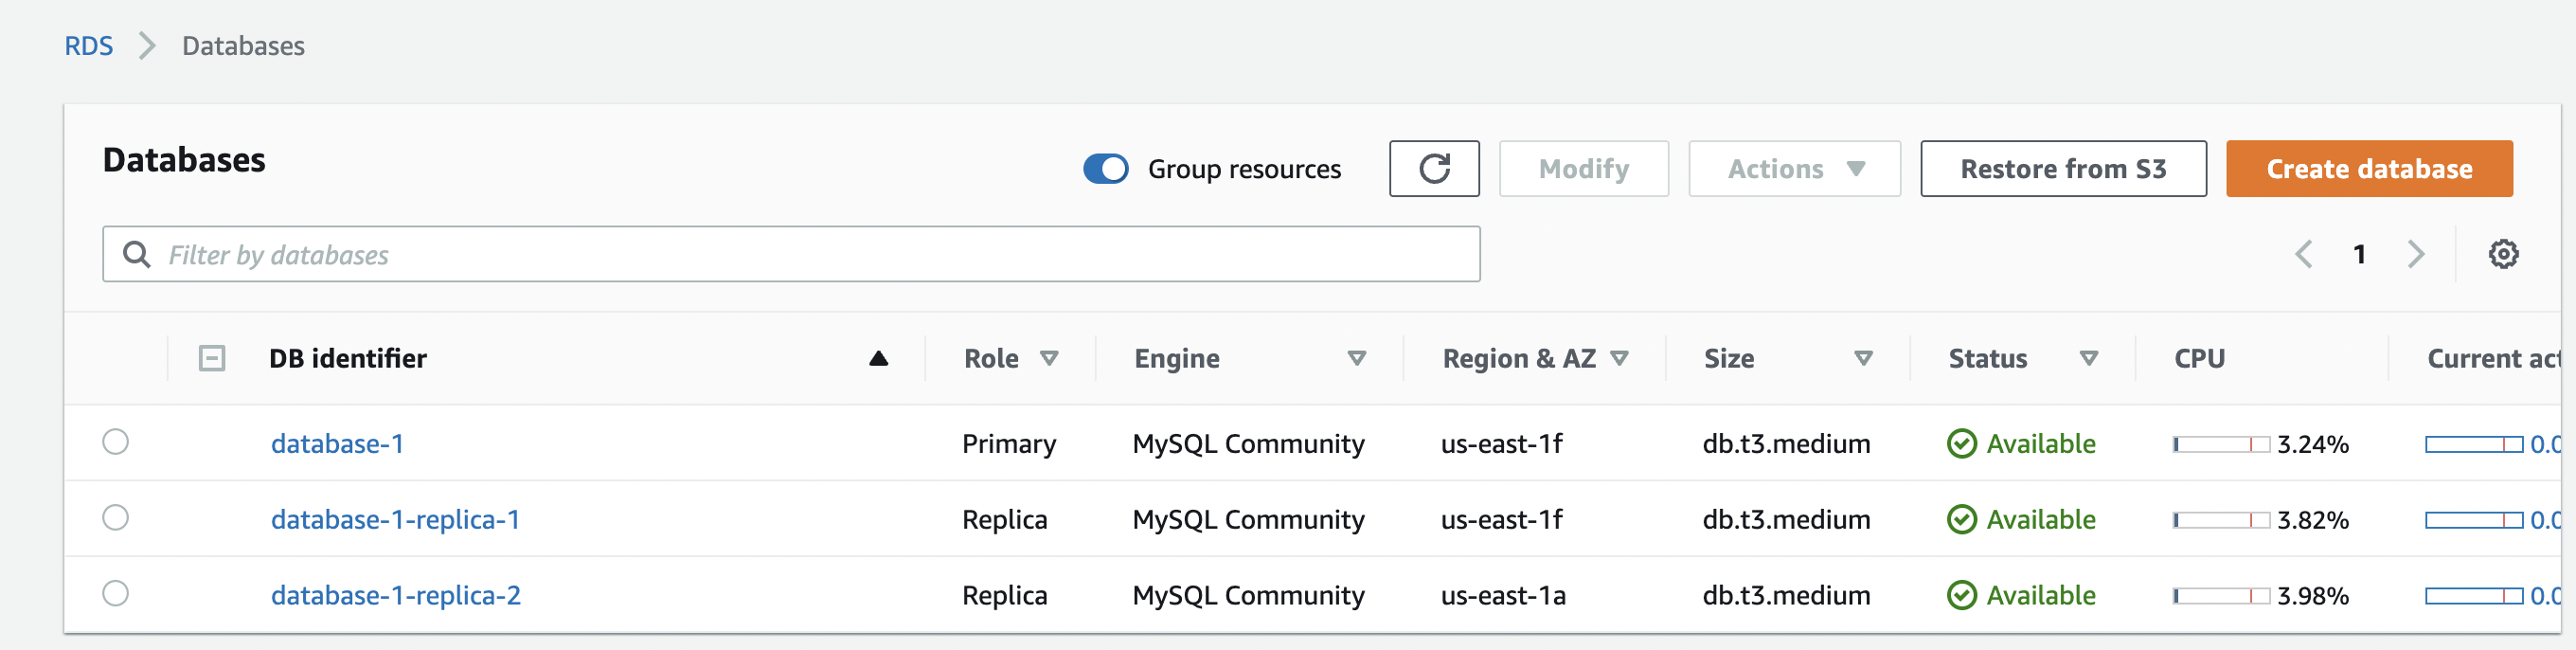
Each database instance (including replicas) will have a unique DNS connection string. However, if we were in an application, we wouldn’t want to manage connecting to the different strings. Also, if we add or remove a replica, we will need to update the connection strings in our application. A good practice would be to use Route 53 to distribute read requests across multiple Amazon RDS instances. Therefore, we will tackle that next.
Use Route 53 to load balance Amazon RDS read replicas
We will use Amazon Route 53 weighted record sets to distribute requests across our read replicas. Weighted routing lets us associate multiple resources with a single domain name or subdomain. It allows us to choose how much traffic is routed to each resource.
Create Route 53 hosted zone
- Search for Route 53 in the AWS console.
- Navigate to Hosted Zones and select Create hosted zone.
- Enter any Domain name and select a Private hosted zone for the type. Our database instances are only accessible within the VPC. Any domain name works here because we are creating a private hosted zone.
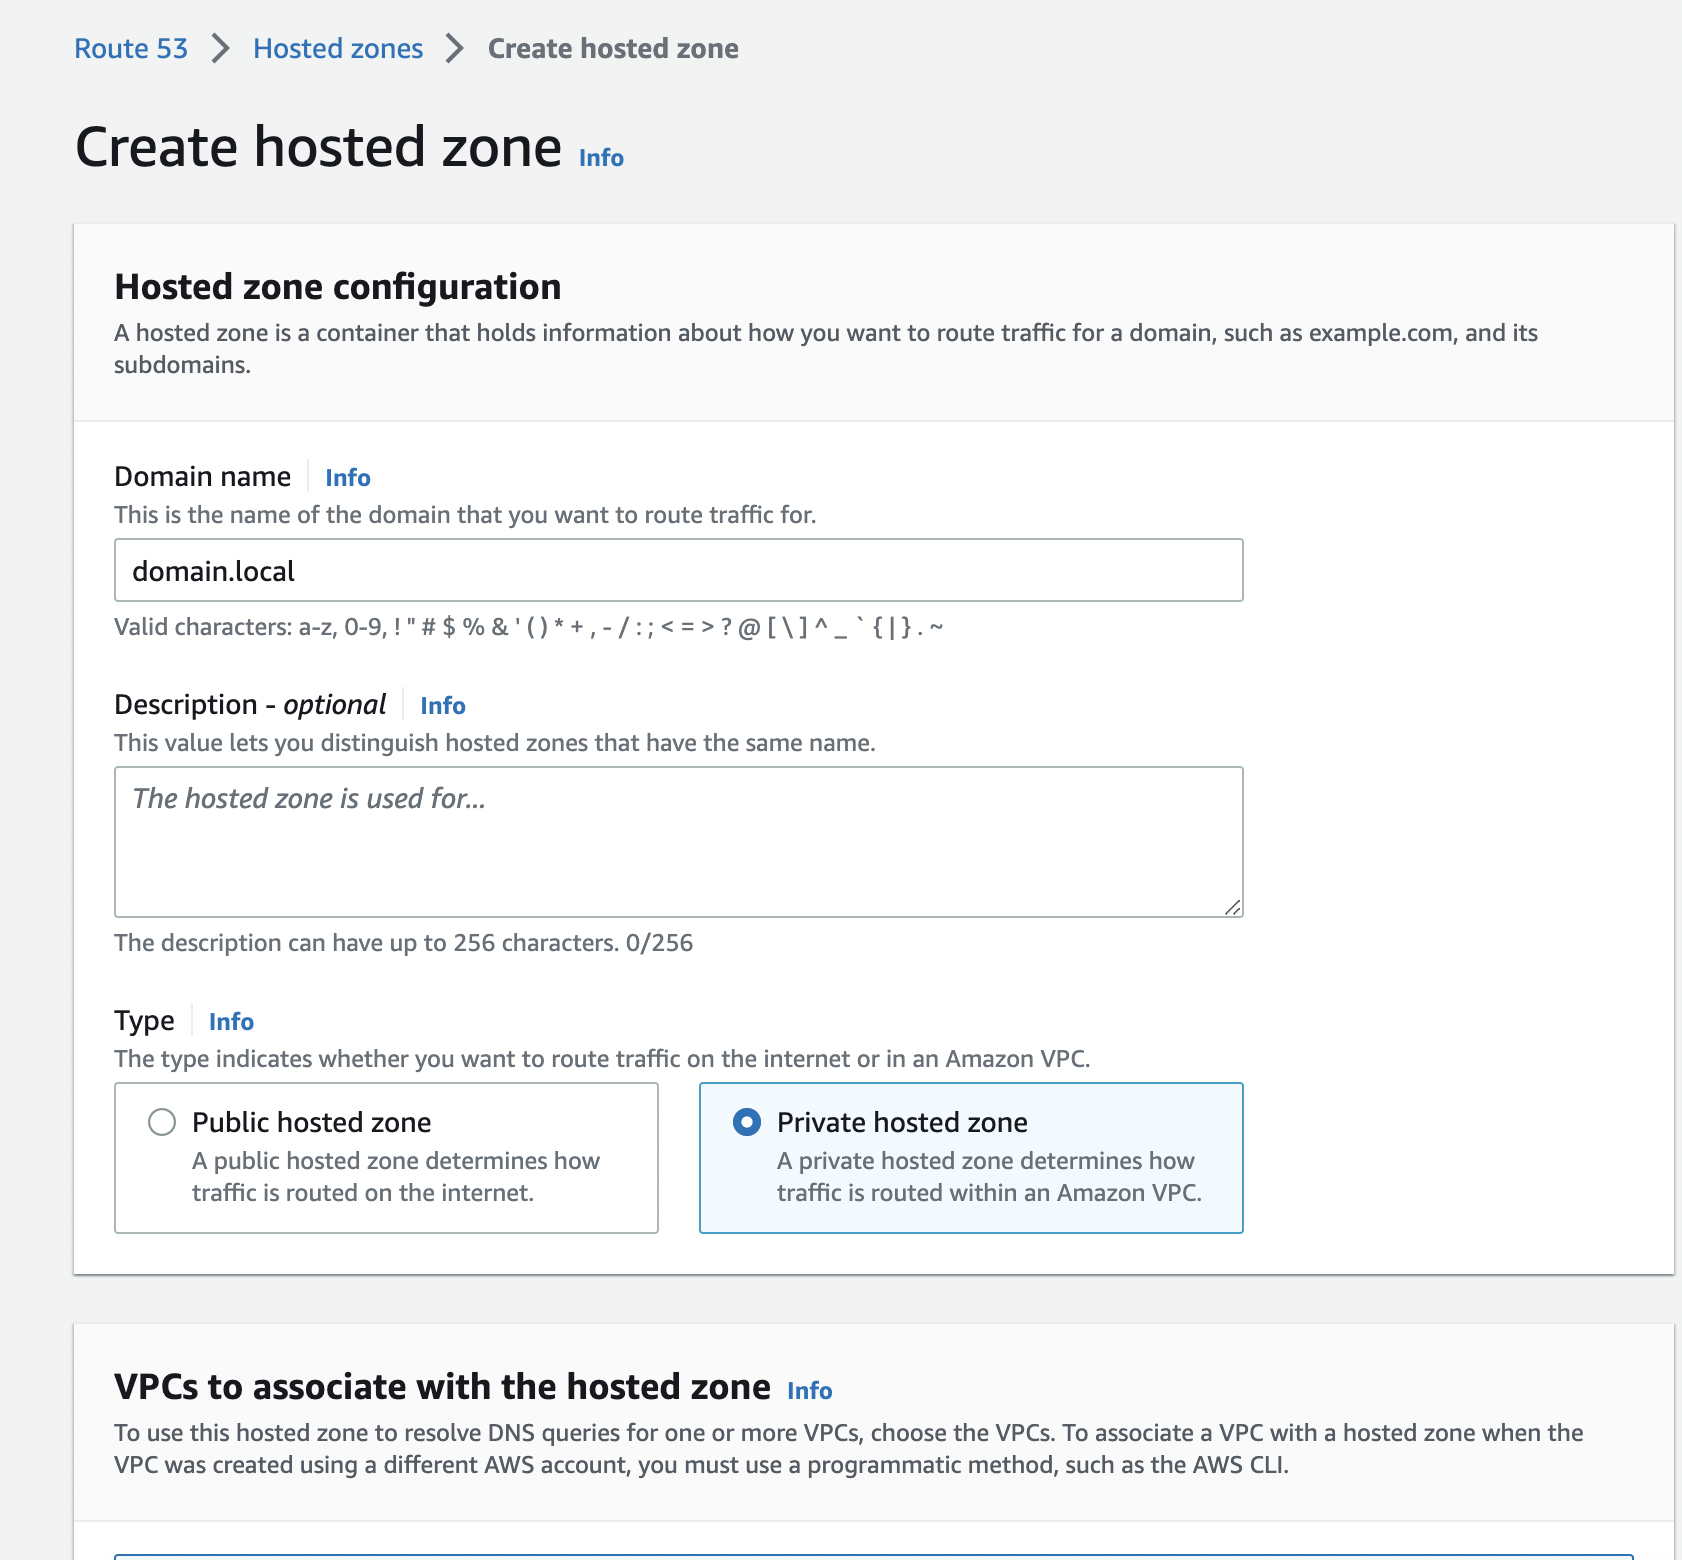
- Select the same VPC that your database instances are launched in
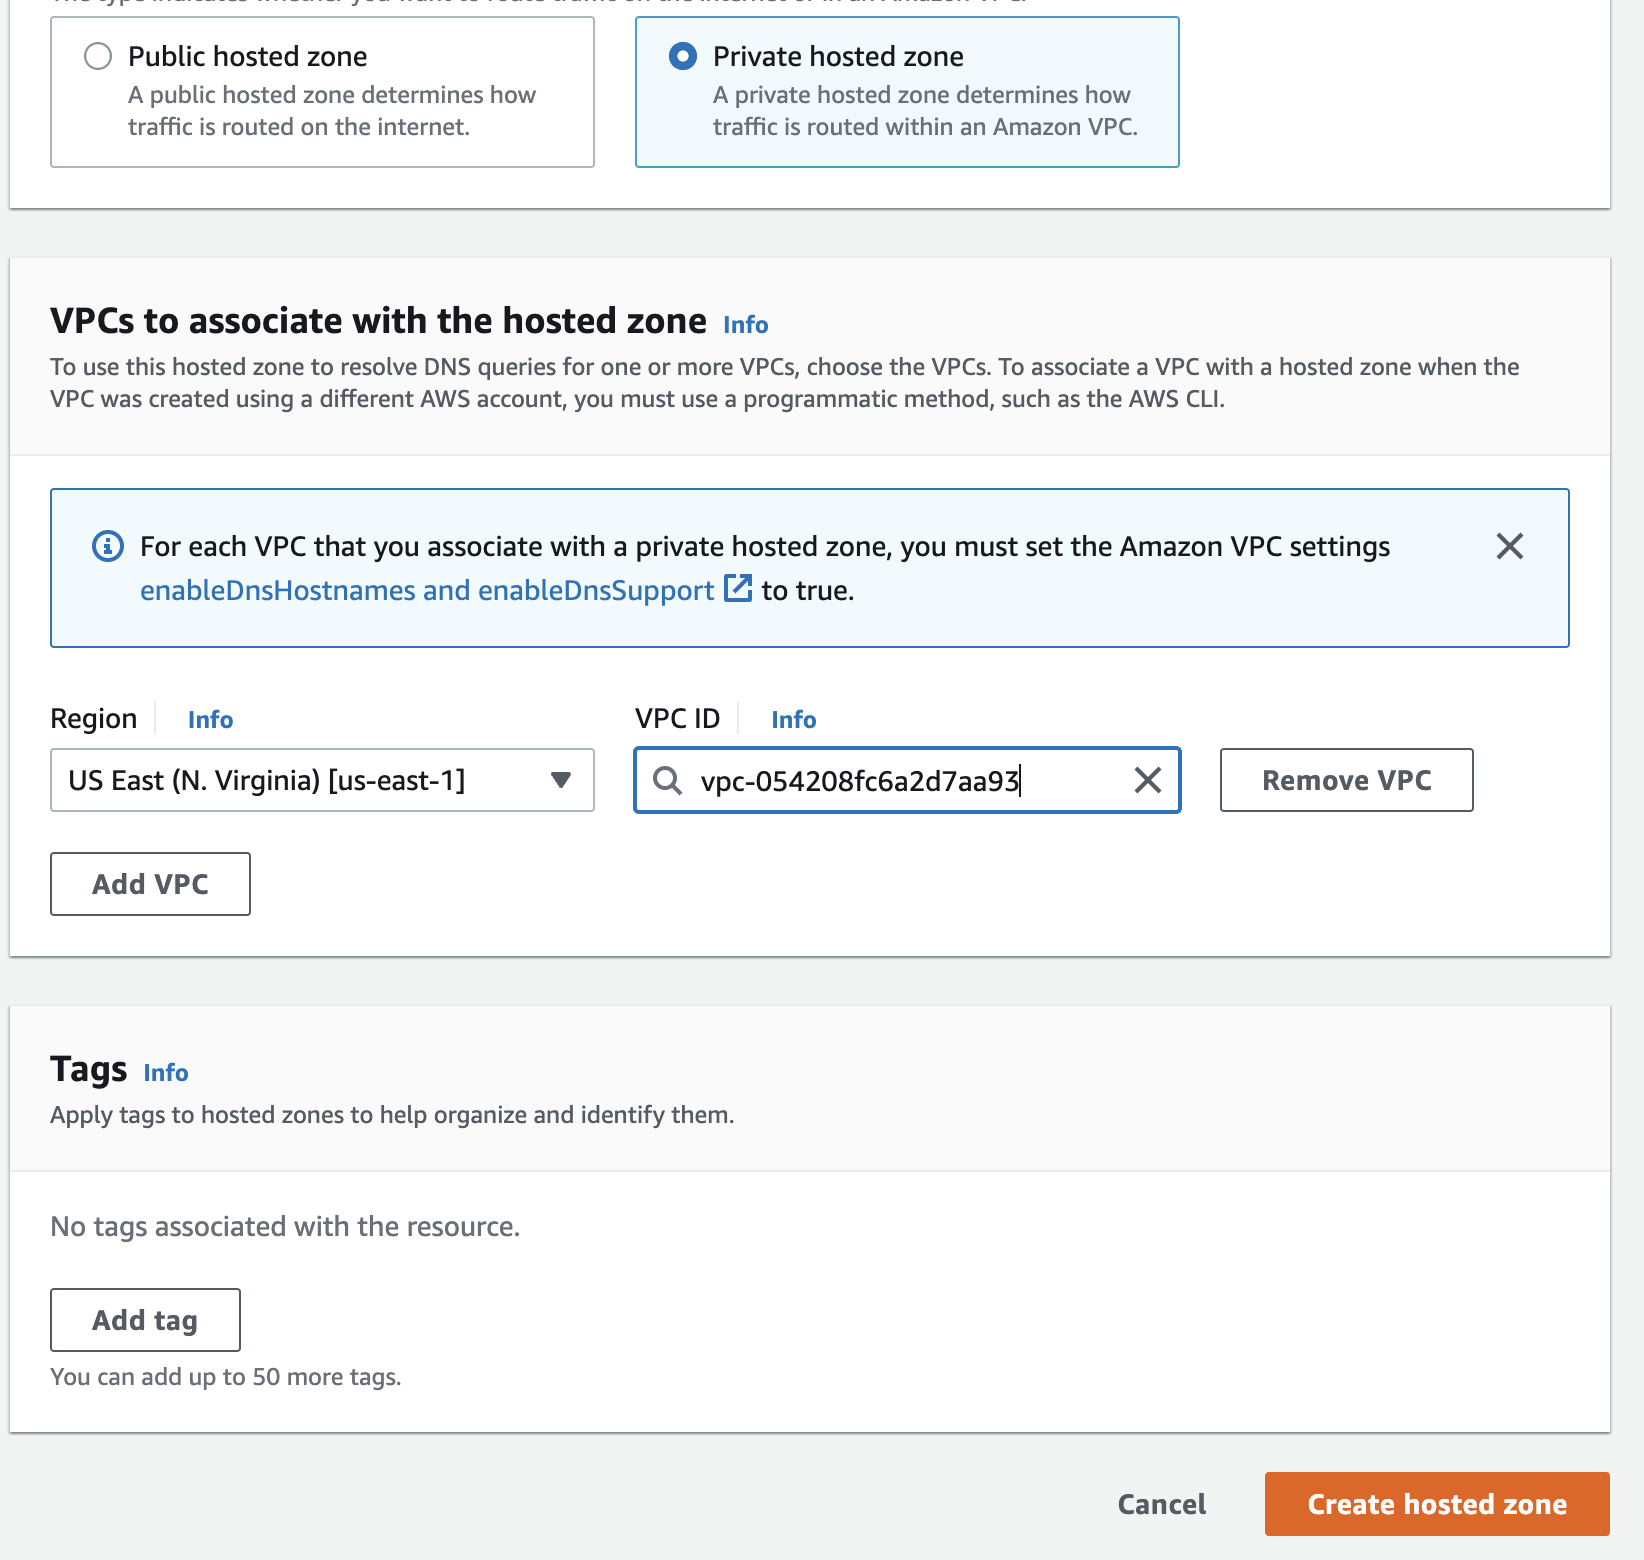
- Click Create hosted zone
Create hosted zone CNAME records
Now that we have our hosted zone created, the next task is the creation of our zone CNAME records. Each database instance DNS endpoint will map to a specific CNAME record. We will still accept reads on our primary database instance, so we will add a record for the primary instance.
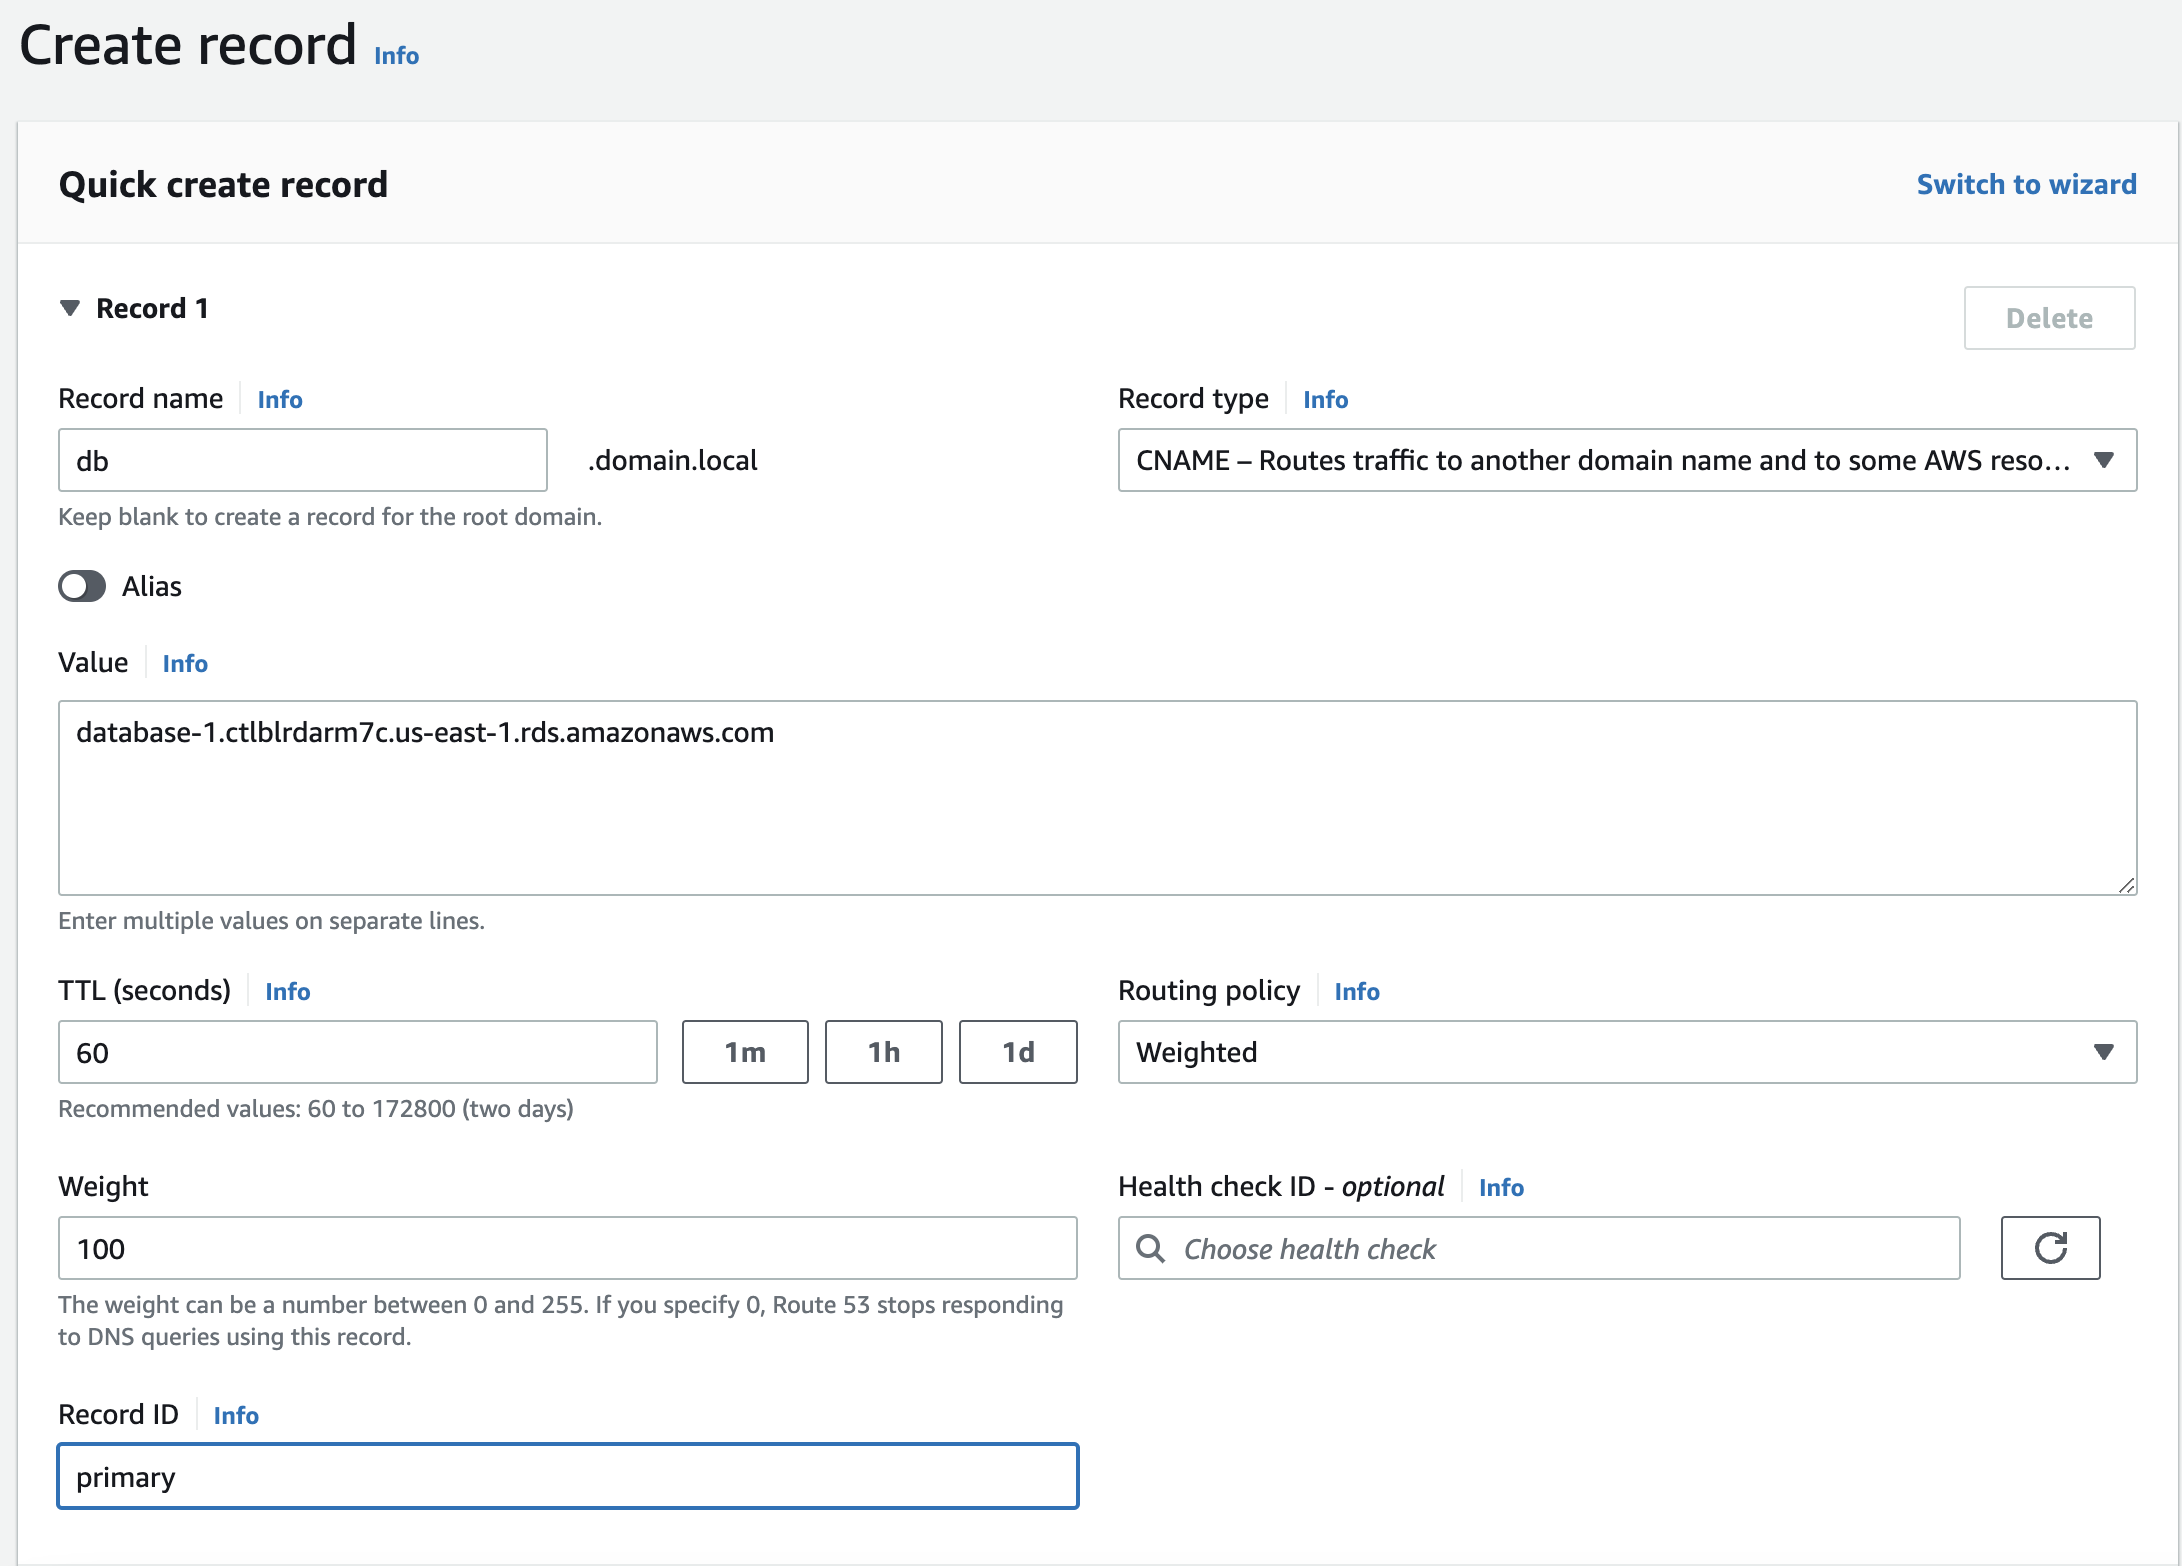
- Create the primary database instance CNAME record by clicking Create record. Fill in the form with the following fields:
Record name - db
Record type - CNAME
Value - YOUR_PRIMARY_DATABASE_DNS_ENDPOINT
TTL - 60
Routing policy - Weighted
Weight - 100
Record ID - ANY_UNIQUE_VALUE_WITHIN_RECORDS
- Repeat the above for the two replicas. Make sure to use DNS endpoints for the replicas in the Value field and add unique Record IDs. When done, your record list should look as below.
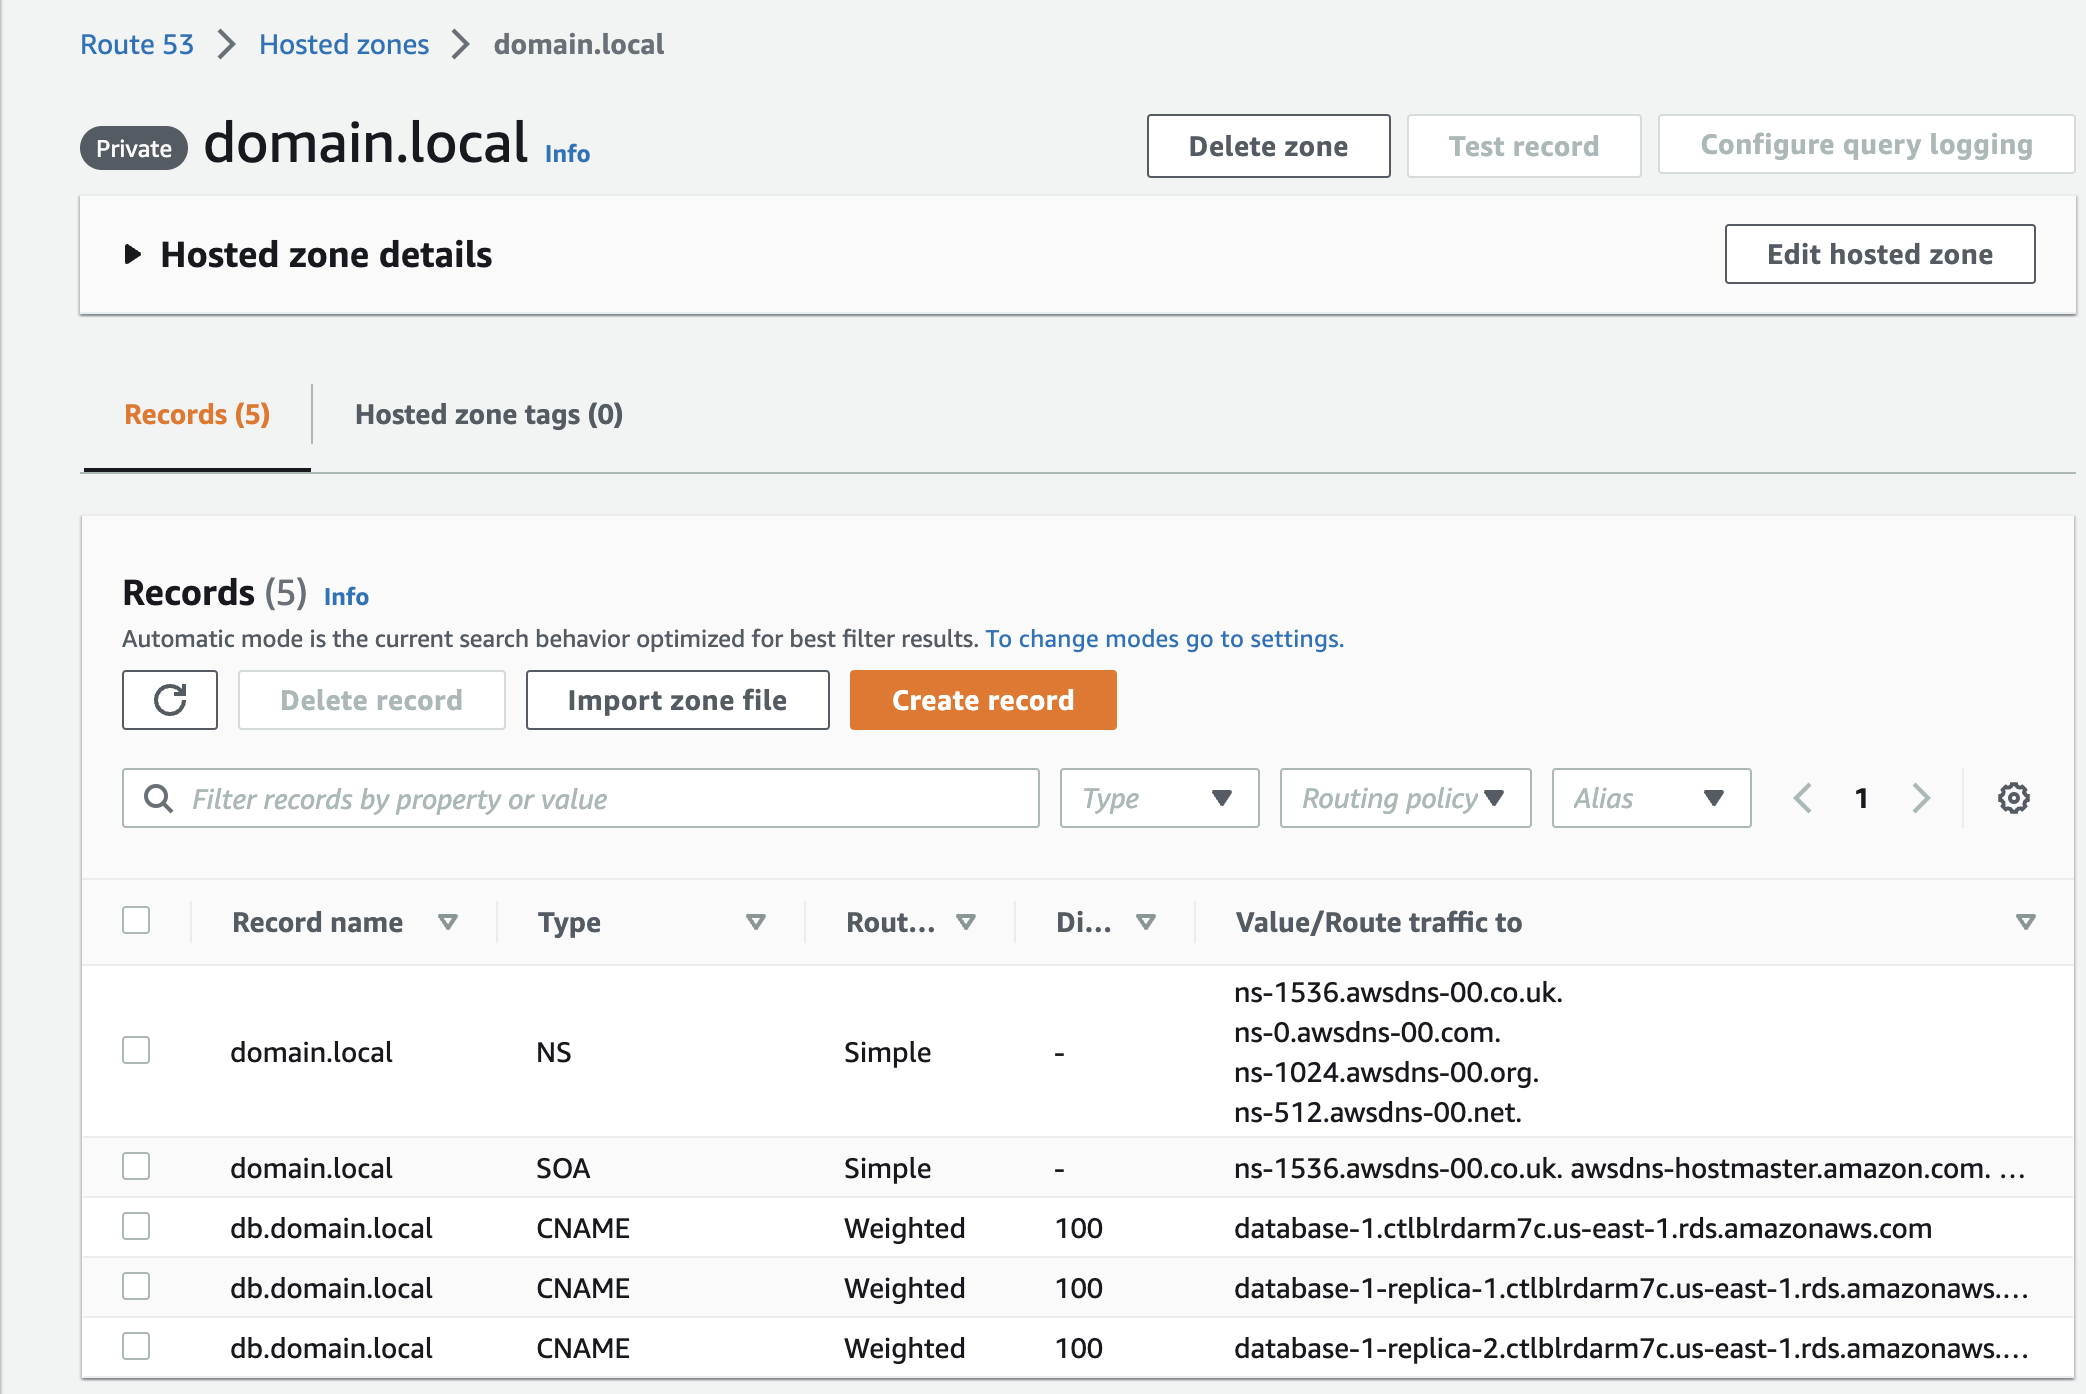
We should now be able to connect to MySQL using the Record name.
For example, mysql -h db.domain.local -u admin -p. We should only use this record name for reads because database writes will fail when we get routed to replicas (by default, replicas are read-only).
Run mysqlslap on primary instance and read replicas
We will use the same mysqlslap command as before. The only change is our database host which is db.domain.local this time.
$ mysqlslap -h db.domain.local -u admin -p \
--concurrency=10 \
--iterations=15 \
--create-schema=employees \
--query="SELECT * FROM employees;SELECT * FROM titles;SELECT * FROM dept_emp;SELECT * FROM dept_manager;SELECT * FROM departments;" --delimiter=";" \
--verbose
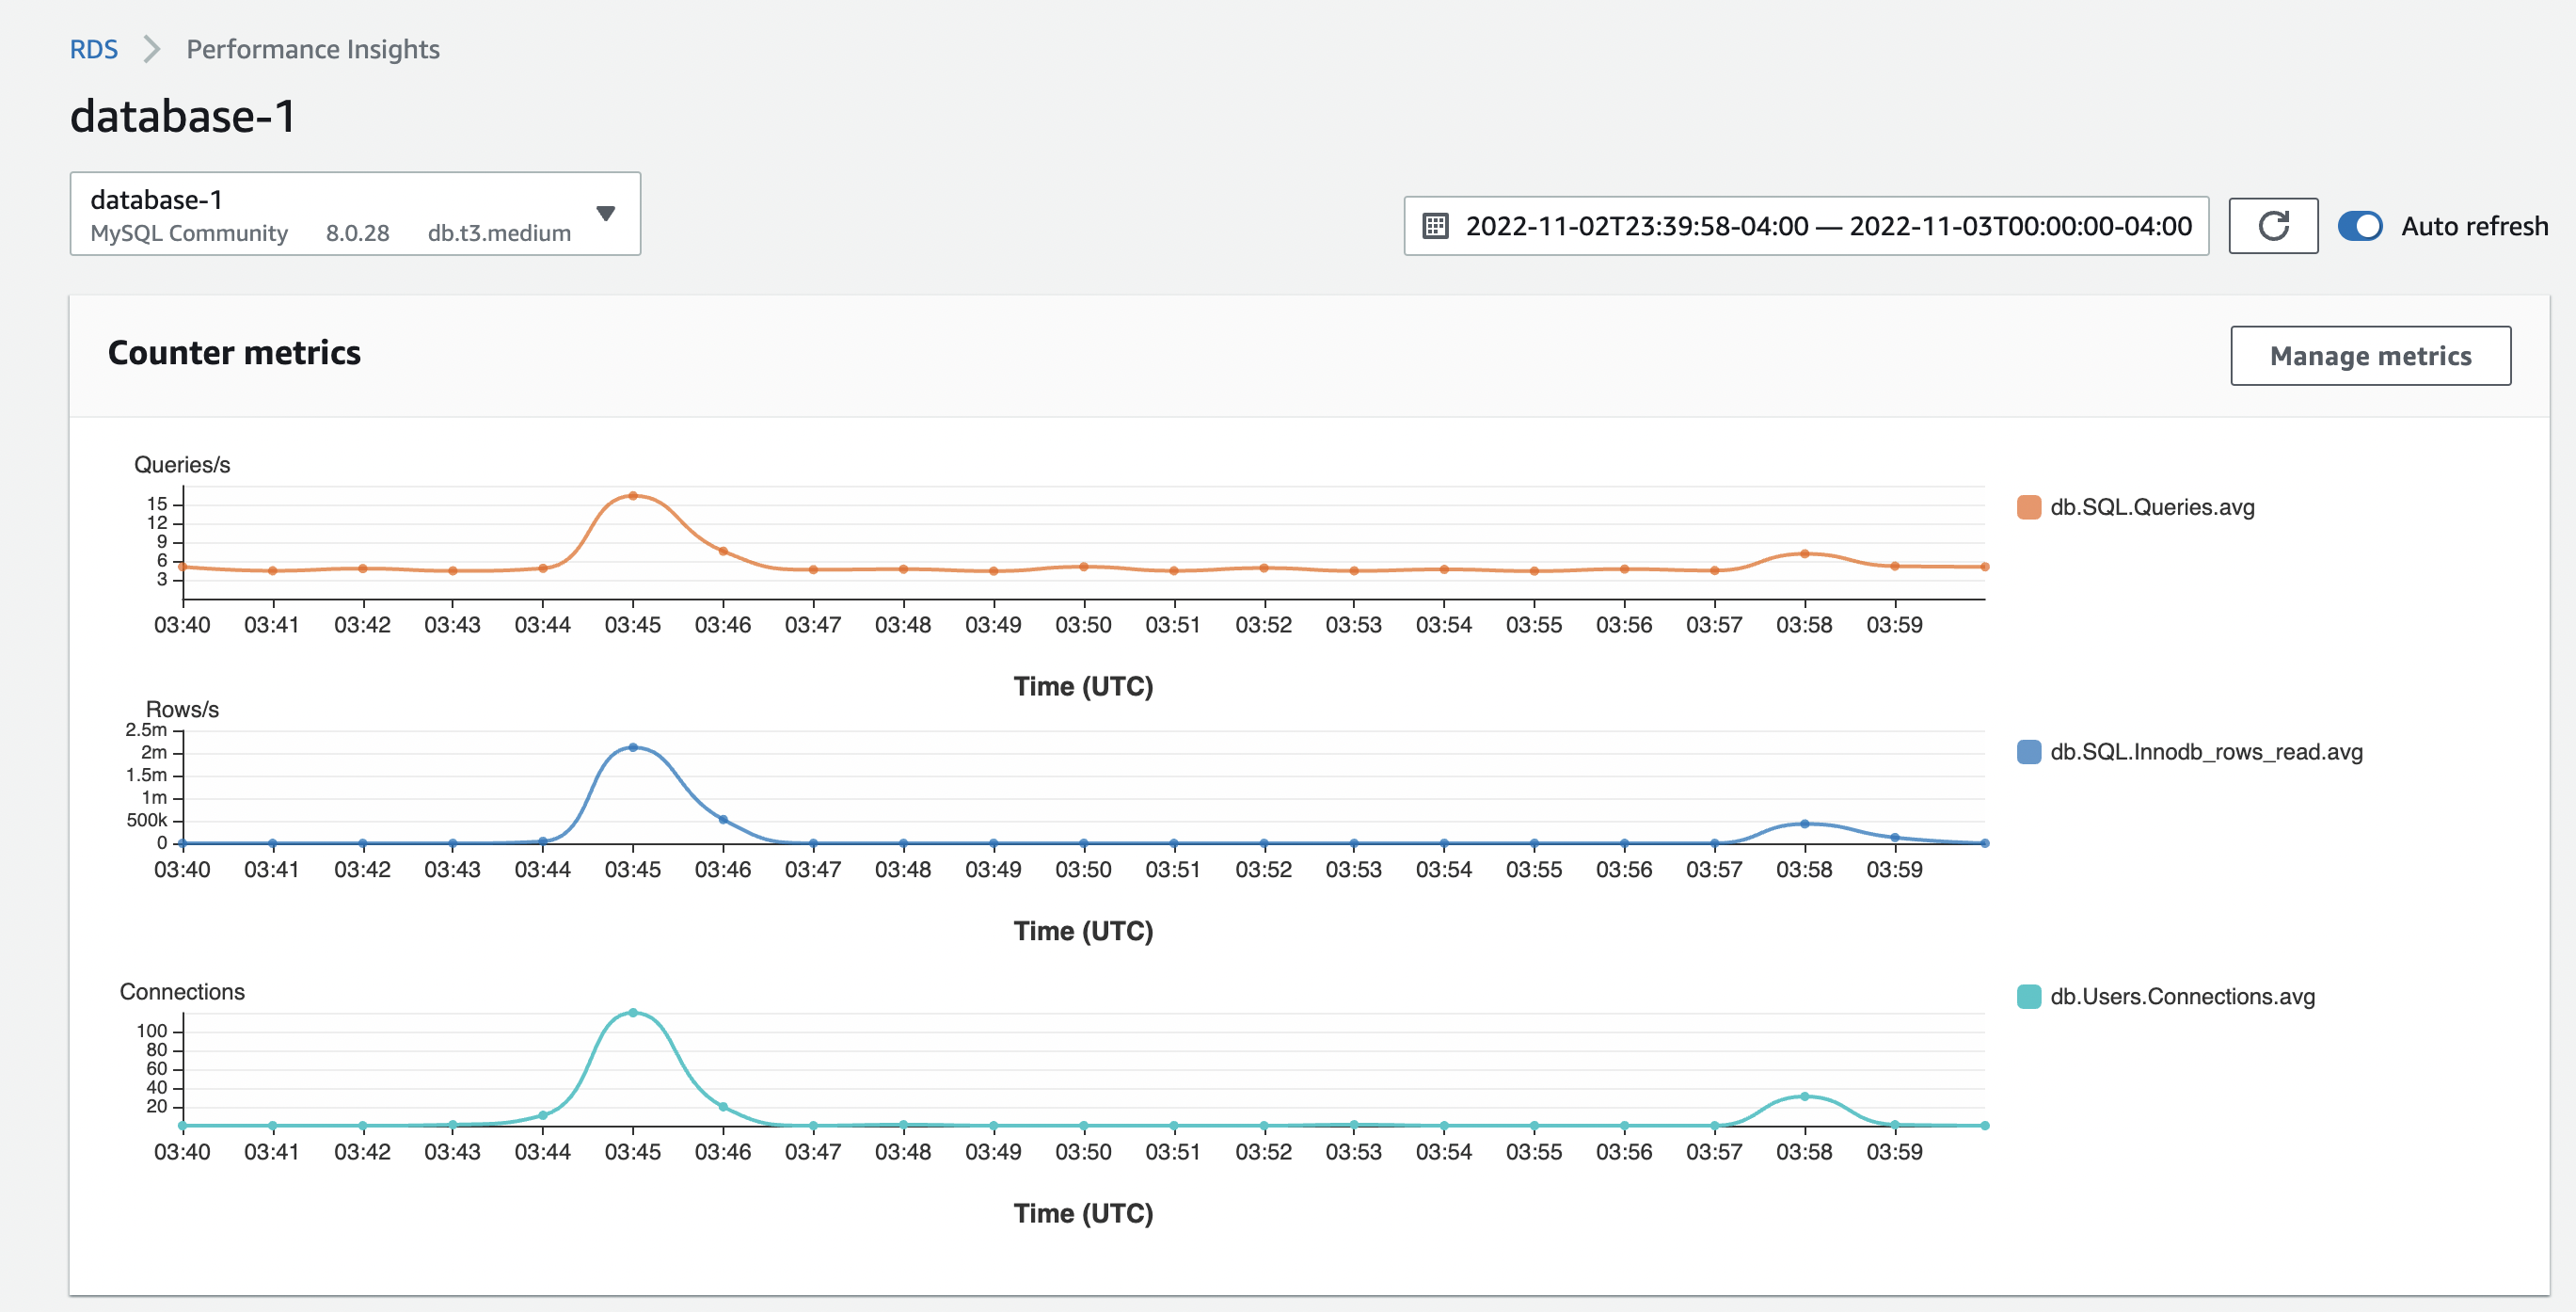
After the command is done, give Performance Insights a little time and you should see a difference in database load.
Database load on the primary instance before and after adding read replicas.
Database load sliced by SQL queries
Database load sliced by Waits

Conclusion
As you can see, for the same queries and clients, the load is reduced on our primary database instance because we are offloading some of the reads to our read replicas. Our primary database instance can take care of writes without being swamped with reads. You can even go further and only use the primary database for writes only. You can achieve that by deleting the primary database CNAME record from Route 53 or by setting the weight value to a value of zero. We could also have created a CNAME record for writes and routed our write traffic via Route 53.